
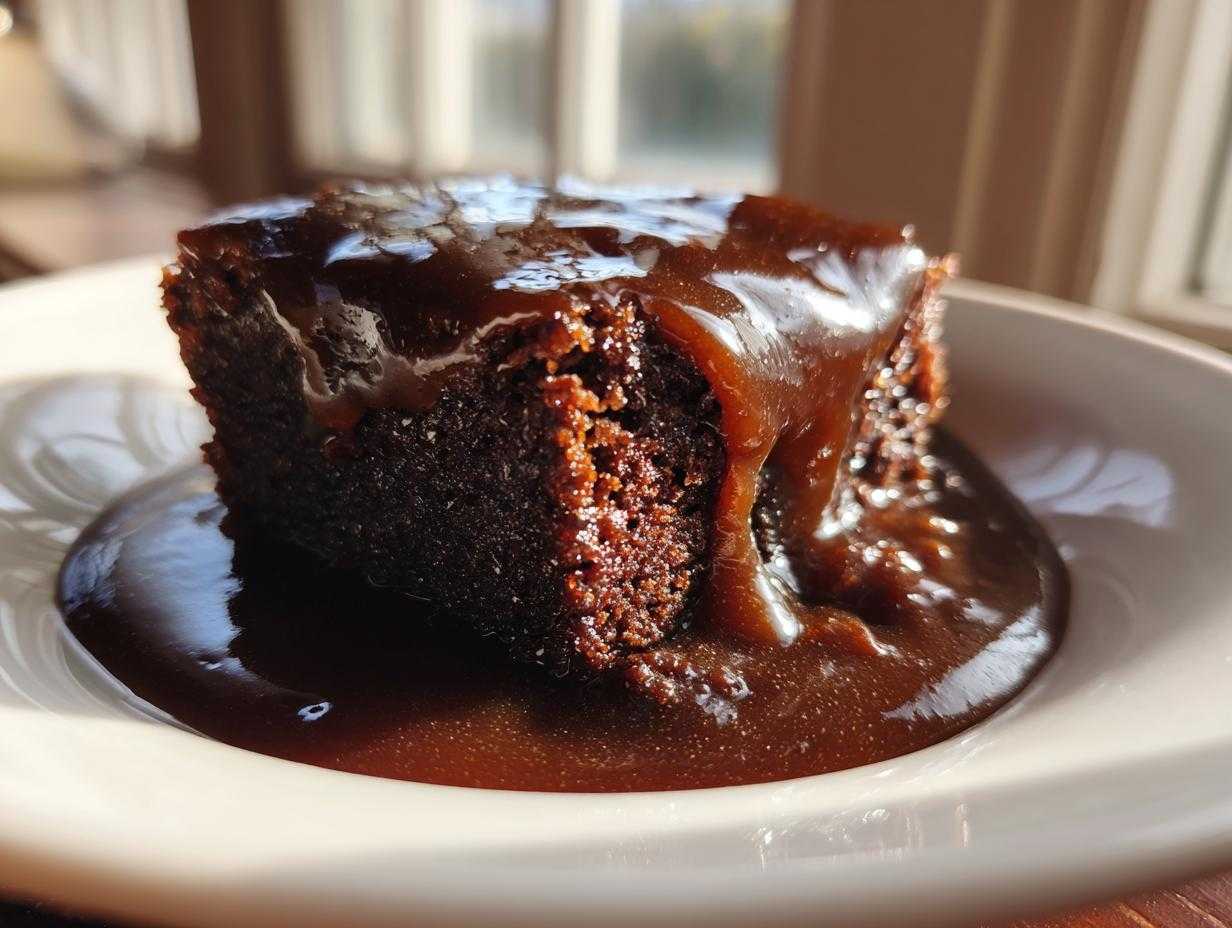
When the craving hits for something truly decadent, nothing beats a rich, warm chocolate dessert that practically melts in your mouth. Forget those complicated layered cakes, friends! I’ve got the absolute easiest, most magical recipe for a true **chocolate pudding cake**, and trust me, it’s a game-changer. This isn’t just cake; it’s a two-for-one deal straight out of the oven! As it bakes, the magic happens: a perfectly moist cake layer forms right on top of a pool of thick, fudgy, intensely chocolate sauce. I adore this recipe because it takes pantry staples and turns them into pure homemade comfort food in under an hour. It’s my go-to when I need serious chocolate therapy, fast!

Why This Classic Chocolate Pudding Cake Recipe Works So Well
Honestly, this is the best chocolate pudding cake recipe you are ever going to find because it solves the eternal dessert dilemma: you want cake AND sauce, but you don’t want to make two separate things! It’s so quick, which I love after a long day. It requires almost no special equipment—just whisks and bowls. Who doesn’t want an easy chocolate dessert that tastes like it took all day? You get that rich, deep chocolate flavor we all crave without any fuss.
This dessert is famous because it delivers incredible texture complexity every single time. It’s what I turn to when I need a true, fudgy pudding cake experience without dirtying a million pans.
Achieving the Perfect Two Layer Chocolate Pudding Cake
The self-saucing magic comes from a clever trick with the water. You mix all the cake ingredients, pour that batter in, and then sprinkle a dry sugar/cocoa mix right on top. When you pour boiling water gently over the top, the liquid sinks beneath the cake batter during baking. The top sets into cake, and the liquid underneath turns into that gorgeous, gooey sauce. It’s pure science, but it tastes like heaven!
- It’s unbelievably fast: Prep time is just about ten minutes!
- The texture contrast is amazing: Moist cake sitting right on top of a molten chocolate center.
- It’s economical—everything you need is likely already in your pantry.
If you’ve ever wanted to recreate that incredible molten chocolate center cake at home, this is your blueprint. For more intensely gooey chocolate experiences, you might want to check out my ultimate chocolate lava cake post!
Ingredients for the Best Chocolate Pudding Cake
When we talk about the best chocolate pudding cake, we have to talk about quality ingredients, even though this recipe is so simple. Don’t skip the measurements here—this dessert relies on getting those ratios just right, especially since we aren’t stirring the topping in! You’ll need one cup of milk, half a cup of vegetable oil, and two large eggs for the main batter structure. Throw in a teaspoon of vanilla extract for aroma.
For the dry base, grab 1 1/2 cups of all-purpose flour, 1 1/2 cups of regular sugar, plus the crucial half-cup of unsweetened cocoa powder, a teaspoon of baking soda, and half a teaspoon of salt. Now, the secret to that intense dark flavor? It’s all about your cocoa! I always reach for a Dutch-processed variety if I can find it, as it gives the deepest chocolate hit. For a little extra help on your baking journey, I share a few pantry swap secrets in my post about secret ingredient chocolate chip cookies that might translate well here, too!
Finally, the sauce requires a separate mix: sprinkle over the remaining half-cup of sugar and the last quarter-cup of cocoa powder. That’s it! Just remember to have that 1 cup of boiling water ready right before you bake!
Step-by-Step Instructions for Your Chocolate Pudding Cake
Okay, let’s get this decadent dessert into the oven! I promise you, it’s super straightforward. First things first: get your oven preheated to 350 degrees F (175 degrees C). While that’s warming up, lightly grease and flour your 8×8 inch baking dish. This dessert loves to stick, so don’t skimp on the preparation step!
We are going to mix this up in two parts: the cake batter, and then the topping that becomes the sauce. Remember, timing matters here, so make sure you have your cup of water already boiling on the stove before you start assembling the liquids.
- Preheat & Prep: Oven to 350°F. Grease and flour that 8×8 dish.
- Mix Dry Ingredients: Grab a big bowl and whisk together the flour, 1 1/2 cups of sugar, the first half-cup of cocoa powder, your baking soda, and salt. Whisk it good so everything is evenly distributed!
- Add Wet Ingredients: Now, dump in the milk, the oil, the vanilla extract, and both eggs. You just need to beat this on medium speed for exactly two minutes until it looks smooth and combined. Don’t overdo it, just mix until it’s uniform.
- Pour the Batter: Pour that beautiful, thick batter right into your prepared baking dish and spread it out evenly.
Preparing the Batter for the Chocolate Pudding Cake
When you mix the batter, you are aiming for complete incorporation—you shouldn’t see any streaks of dry flour floating around. I use my hand mixer for the full two minutes at medium speed, just like the recipe says. This helps activate the baking soda we added. Once it’s smooth, transfer it immediately to the baking dish. We want that topping to hit this smooth surface right away so the chemical reaction for the sauce starts perfectly when it hits the heat!
Creating the Self-Saucing Layer in Your Chocolate Pudding Cake
This next part is crucial, so listen closely! In a separate, tiny bowl, mix up your remaining 1/2 cup of sugar and 1/4 cup of cocoa powder. Sprinkle this dry mixture evenly over the batter you just poured. This dry layer is the key to the whole thing. Now, for the most important rule: Do NOT STIR. Slowly and carefully pour that cup of boiling water right over the top of all that sprinkled dry mix. Watch it—it will look weird, but trust me, it separates as it bakes. Into the oven it goes for about 30 to 35 minutes!
Tips for a Flawless Self-Saucing Chocolate Pudding Cake
Achieving that perfect gooey chocolate cake with a dedicated sauce layer is all in the details, my friends. My biggest tip for this chocolate pudding cake is that boiling water step—you cannot substitute hot tap water! It has to be boiling, or the reaction that separates the cake from the sauce won’t happen correctly. If you use water that’s just warm, you risk ending up with one big, soupy mush, and nobody wants that disappointment!
Another thing I learned the hard way is that your baking dish can affect the sauce amount. If you use a pan much larger than 8×8 inches, the sauce layer will spread too thin. Stick to that size for the deepest, richest puddle of fudge. For more intense chocolate experiences, I always recommend boosting the flavor, similar to how I handle my fudgy triple chocolate brownies. Trust me, a little attention to these small issues turns this easy dessert into legendary chocolate magic!
Serving Suggestions for Warm Chocolate Cake
You absolutely must serve this dessert warm—it’s the best way to experience the texture difference! The contrast between the still-hot, molten chocolate pudding underneath and the fluffy cake layer on top is just heavenly. Seriously, don’t let it cool down too much; you want that fudge sauce spoonable.
Naturally, my favorite way to eat this warm chocolate cake is with a big, cold scoop of vanilla bean ice cream right on top. The ice cream immediately starts to melt into the sauce, creating this incredible swirl of warm fudge and cold creaminess. If ice cream isn’t your jam, a simple, fresh dollop of whipped cream is fantastic. For something a little less traditional—but still amazing—you should check out my recipe for olive oil ice cream; it adds a surprising depth!
Storage and Reheating Instructions for Leftover Chocolate Pudding Cake
So, it happens—you have leftovers! That’s rare with this dessert, but if you do have some amazing chocolate pudding cake remaining, you need to store it carefully. Pop any leftovers into an airtight container. Because the sauce is basically a warm fudge right out of the oven, it tends to firm up significantly once it chills in the fridge. Don’t let that scare you off!
To bring that gooey texture back to life, you’ll need gentle reheating. I just scoop out a serving and microwave it for about 20 to 30 seconds. You just want to warm that fudge sauce until it loosens up again. If you are reheating the whole thing, use a lower oven temperature for about 10 minutes to warm it through evenly. It tastes almost as good the second day, honestly!
Frequently Asked Questions About Chocolate Pudding Cake
Can I prepare this chocolate pudding cake ahead of time?
This is a tricky one because the magic relies on that boiling water hitting the batter right before it goes into the oven! For the best results, I strongly recommend assembling the cake batter and sprinkling the topping right before baking. If you mix the batter too far ahead, the baking soda starts working too soon, and you lose lift. However, you can certainly prep the dry mix for the sauce (the sugar and cocoa) the night before and have your milk and eggs ready to go. It’s designed to be a super quick chocolate baking recipe, so I always aim for 10 minutes of prep right before I bake!
Why didn’t my sauce thicken properly? Is it supposed to be liquid?
Oh, I totally sympathize here—seeing a soupy bottom layer is heartbreaking! If you made a wonderful gooey chocolate cake that didn’t separate, the culprit is almost always the water temperature or the stirring. Remember, you must use boiling water, not just hot tap water. The boiling water is what sinks through the dry topping and creates the liquid layer. Also, and this is crucial, you absolutely cannot stir once you put that water on top! If you mix that liquid in, you just end up with a single, very dense, moist cake rather than the two-layer effect.
Can I substitute the oil for melted butter in this fudgy pudding cake?
You certainly *can* substitute oil for butter, but I always advise against it for this specific recipe. Oil keeps the cake layer lighter and moister longer, which is essential when you have that liquid sauce underneath. Butter will make the cake layer slightly denser, and it might weigh down the structure too much, interfering with the self-saucing action. If you need to swap it, use melted butter one-for-one, but just know your cake top might not be quite as fluffy. If you’re a big butter fan, you might want to check out my thoughts on swapping fats in my 2-ingredient Nutella mousse!
Can I add chocolate chips or nuts to this baked chocolate pudding?
Yes! This is a great way to customize your homemade comfort food dessert. If you decide to add chocolate chips, I recommend folding about a half-cup into the cake batter right before you pour it into the pan. If you use semi-sweet or milk chocolate chips, they melt beautifully into the sauce layer. For nuts—walnuts or pecans are fantastic—toss them in with the dry topping mix (the second sugar/cocoa mix) so they get slightly caramelized by the boiling water and stay on top of the cake layer!
Quick Facts About This Decadent Chocolate Pudding Cake
I know you’re probably eager to jump into baking right now, so here are the essential details summarized for you. These are the times and yields you can expect when making this super easy dessert. Honestly, the total time is fantastic for how impressive this chocolate pudding cake looks once it’s out of the oven!
- Prep Time: Just about 10 minutes! That’s faster than deciding what to watch on TV.
- Cook Time: 35 quick minutes in the oven.
- Total Time: We are looking at 45 minutes total time from start to finish. How’s that for a weeknight chocolate treat?
- Yield: This recipe makes about 6 generous servings. Plenty for sharing—or not, I won’t tell!
- Category: Definitely labeled as a Dessert. A true showstopper!
- Method: Baking is the required technique here.
- Cuisine: Classic American comfort food.
- Diet: This recipe is naturally Vegetarian.
Nutritional Estimates for One Serving
Now, I know some of you are tracking everything, and believe me, whenever I check a recipe online, the first thing I look for are the details! But here is my disclaimer, straight from my kitchen heart to yours: Since this is my family’s go-to comfort food, the exact nutritional blueprint changes slightly depending on the brand of cocoa powder I use or the type of sugar I grab off the shelf.
Because of that variability, I don’t provide a hard, fast, exact calorie count for this incredible decadent chocolate pudding. My estimates can be misleading based on your actual measurements! What I can tell you is that this is intended as an occasional, glorious treat, not a daily staple. If you’re looking for healthier twists on chocolate, I always point people toward my avocado chocolate mousse post—it’s surprisingly bright and delicious!
Just know that when you are digging into that warm slice with ice cream, you are enjoying pure, rich, incredible chocolate bliss. And sometimes, that’s the only metric that truly matters, right?
Print
Classic Self-Saucing Chocolate Pudding Cake
- Total Time: 45 min
- Yield: 6 servings
- Diet: Vegetarian
Description
Make this rich, gooey chocolate pudding cake that separates into a moist cake top and a decadent, fudgy sauce bottom while baking.
Ingredients
- 1 1/2 cups all-purpose flour
- 1 1/2 cups granulated sugar
- 1/2 cup unsweetened cocoa powder
- 1 teaspoon baking soda
- 1/2 teaspoon salt
- 1 cup milk
- 1/2 cup vegetable oil
- 1 teaspoon vanilla extract
- 2 large eggs
- 1 cup boiling water
- 1/2 cup granulated sugar (for sauce)
- 1/4 cup unsweetened cocoa powder (for sauce)
Instructions
- Preheat your oven to 350 degrees F (175 degrees C). Lightly grease and flour an 8×8 inch baking dish.
- In a large bowl, whisk together the flour, 1 1/2 cups sugar, 1/2 cup cocoa powder, baking soda, and salt.
- Add the milk, oil, vanilla extract, and eggs to the dry ingredients. Beat with an electric mixer on medium speed for two minutes until well combined. Pour this batter into the prepared baking dish.
- In a separate small bowl, mix the remaining 1/2 cup sugar and 1/4 cup cocoa powder for the sauce. Sprinkle this mixture evenly over the top of the batter.
- Carefully pour 1 cup of boiling water over the top of the sprinkled mixture. Do not stir.
- Bake for 30 to 35 minutes. The top will look like cake, and the bottom will be liquid sauce.
- Remove from the oven and let it cool for 5 minutes before serving warm.
Notes
- Serve immediately while warm for the best molten sauce effect.
- Top each serving with a scoop of vanilla bean ice cream or a dollop of whipped cream.
- Use high-quality cocoa powder for a deeper chocolate flavor.
- Prep Time: 10 min
- Cook Time: 35 min
- Category: Dessert
- Method: Baking
- Cuisine: American
Nutrition
- Serving Size: 1 slice
- Calories: 420
- Sugar: 55g
- Sodium: 280mg
- Fat: 18g
- Saturated Fat: 3g
- Unsaturated Fat: 15g
- Trans Fat: 0g
- Carbohydrates: 65g
- Fiber: 3g
- Protein: 6g
- Cholesterol: 45mg


Comments are closed.