

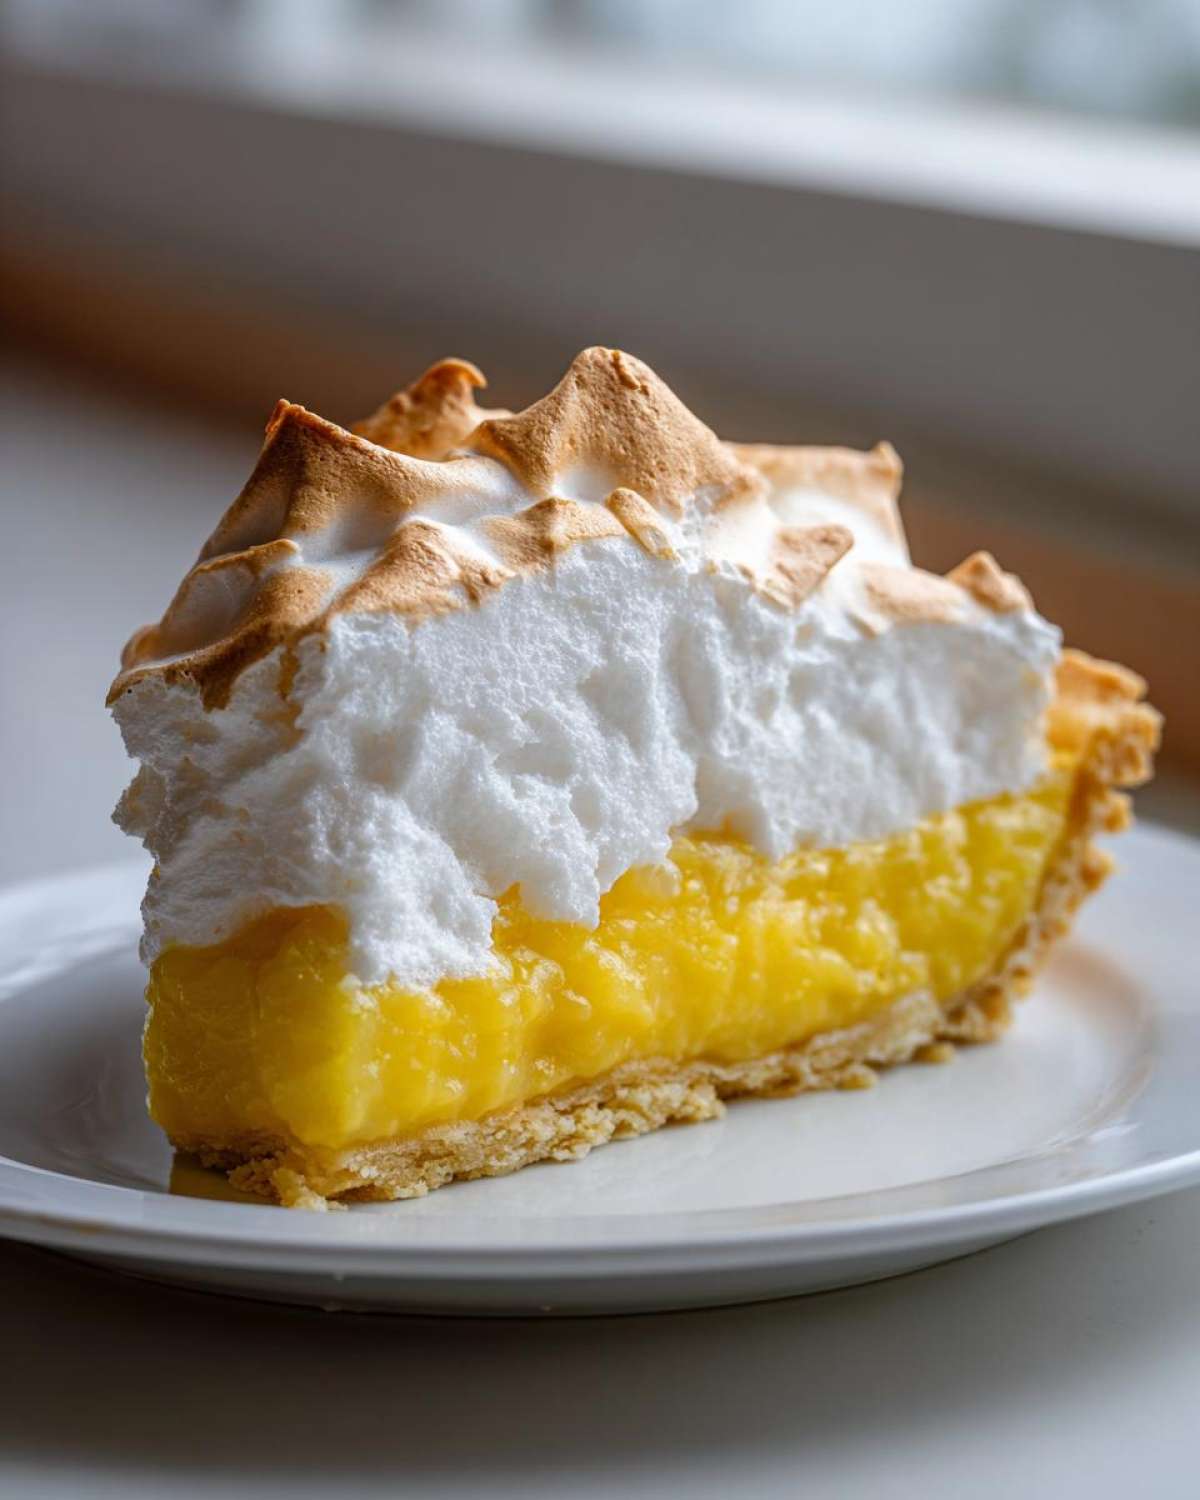
There are some desserts you just have to make from scratch, and for me, the ultimate showstopper is a truly classic Lemon Meringue Pie. Forget the boxed mixes; you know the ones that taste like sour candy mixed with shaving cream? No thank you! This, right here, is the *real deal*. We’re talking about a deep, unbelievably zesty lemon curd cradled in a perfect buttery crust, all crowned with a mountain of sweet, fluffy meringue that stays tall long after it leaves the oven.
I really wrestled with this pie when I first started baking. The curd would break, or the meringue would weep puddles of sad, sugary tears all over the filling. It took me nearly a dozen tries to nail the balance—that perfect sweet and tart dessert harmony! But now? Now it’s my go-to triumph, and I promise you, if you follow these steps, you’ll have the best homemade lemon meringue pie of your life.
Why This Classic Lemon Meringue Pie Recipe Works (E-E-A-T)
This isn’t just any lemon meringue recipe; this is where the structure of a great, tangy lemon dessert meets the ultimate showstopper visual. We’re focusing on the scratch-made quality here because that’s what makes the difference between ‘fine’ and ‘absolutely incredible.’ When you make both the curd and the topping fresh, you control the flavor profile 100%.
- The curd sets up firm and deeply flavorful, never runny.
- You get that beautiful, towering, cloud-like meringue that actually holds its shape.
- It is the perfect demonstration of a classic sweet and tart dessert done right!
Trust me on this; putting in those extra ten minutes for fresh ingredients pays off huge when you slice into this thing. If you love bright flavors, you seriously have to check out my recipe for tangy lemon bars too!
Achieving the Perfect Tart Lemon Meringue Curd
The heart of this pie is that bright, zesty filling. You simply cannot get that electric zing from bottled juice. We use both fresh lemon juice *and* the zest because that’s where the essential oils live that turn this into a true zesty citrus bake. Cooking the cornstarch and sugar mixture until that full boil is key—it gelatinizes the starch properly so your filling is sturdy enough to support the meringue mountain we’re about to build on top. It’s all about making sure the curd is cooked through!
Secrets to a Fluffy Meringue Topping
Nobody likes sad, weeping meringue, right? That usually happens when there’s hidden fat or oil in the egg whites. You absolutely must use egg whites that are completely at room temperature—they whip higher and faster. Also, cream of tartar is our secret stabilizer here; it helps keep those air bubbles firm and glossy even when we put it in the oven. If you want to dive deeper into the science of perfectly stiff peaks, check out my guide on making perfect meringue—it has saved my tail more than once!
Gathering Ingredients for Your Lemon Meringue Pie
Okay, now for my favorite part: gathering the goods! Since this is truly a classic lemon pie experience, we’re going all-in with a homemade crust. If you happen to have a favorite go-to recipe for a blind-baked crust, use it! For those who haven’t mastered the flake yet, I have a few crust recipes you might love, like my super simple water pie variation.
For the Pie Crust (Use your favorite 9-inch recipe)
Here’s the non-negotiable part: your crust needs to be completely baked (blind-baked) and cooled down before you even think about adding the hot filling. If that crust is warm, the filling slides right out, which makes for a soggy disaster. So, crust first, let it chill!
For the Tangy Lemon Meringue Filling
This is where all our zesty magic happens! You need: 1 1/2 cups granulated sugar, 1/4 cup cornstarch, 1/4 teaspoon salt, 1 1/2 cups water, 4 large egg yolks (lightly beaten), 1/2 cup fresh lemon juice, 1 tablespoon lemon zest, and 2 tablespoons unsalted butter. See how we have sugar for the curd and then more for the meringue later? Keep those amounts separate when you measure them out!
For the Fluffy Meringue Topping
For our tall, scratch made meringue, grab 6 large egg whites (must be room temperature), 1/2 teaspoon cream of tartar, and that final 1/2 cup of granulated sugar. Make sure your bowl is spotless—I mean spotless—for this step, or you won’t get that beautiful fluffy meringue topping!
Step-by-Step Instructions for Classic Lemon Meringue Pie
Okay, gloves off! This is where we bring all those amazing ingredients together. Getting this right, especially tempering those yolks, is what separates a good pie from an absolute showstopper. I’ve linked my absolute best lemon meringue pie secrets guide right here in case you get nervous, but honestly, just breathe and follow the heat!
Making the Zesty Lemon Meringue Filling
First things first: make sure that 9-inch pie crust you made earlier is totally cool. We start the filling next. In a saucepan, whisk together 1 1/2 cups of your sugar, the cornstarch, and salt. Now, slowly whisk in the water until it’s smooth, smooth, smooth. Set that over medium heat and stir constantly until it boils and thickens up—let it boil properly for a full minute. Take it off the heat immediately!
Here comes the most important part: tempering. Take about one cup of that hot sugar goo and slowly, slowly drizzle it into your 4 lightly beaten egg yolks while whisking the yolks like crazy. This raises their temperature gently. Then, and only then, pour that warmed yolk mixture back into the saucepan with the rest of the hot stuff. Put it back on medium heat and stir until it boils *again* and thickens nicely. Kill the heat, stir in your lemon juice, zest, and that 2 tablespoons of butter until it melts right in. Pour that hot, tangy filling right into your cooled, ready crust!
Whipping the Scratch Made Meringue
While that filling is still hot (which helps the meringue stick!), get your 6 room-temperature egg whites and the cream of tartar into a sparkling clean bowl. Start mixing on medium speed until you see soft peaks forming—little curls at the tip. Now, slowly—don’t dump it in!—start adding your last 1/2 cup of sugar, about a tablespoon at a time. Crank up that mixer to high and beat until you get those stiff, glossy peaks. They should stand up perfectly straight when you lift the whisk. That’s how you know you’ve got a perfect, scratch made meringue!
Assembling and Baking the Lemon Meringue
Take that beautifully whipped meringue and pile it right onto that hot lemon filling. My biggest tip, folks, is to make sure that meringue touches the crust all the way around the edge. This seals it up tight and stops it from shrinking! Use the back of a spoon to make some gorgeous swirls. Pop it into an oven preheated to 350 degrees F for about 12 to 15 minutes, just until those pretty peaks get lightly toasted. Then, the hardest part: it has to cool on the counter for at least 4 hours before slicing. Seriously, don’t rush this cooling step, or you’ll have soup!
Tips for the Best Lemon Meringue Pie Results
Now that you’ve got this beautiful lemon meringue in the oven, let’s talk about keeping it perfect once it comes out. Anyone who has made this pie more than once knows that the payoff happens during the cooling, and sometimes that’s where things go sideways. We’re going to troubleshoot so you only get success with that truly fluffy meringue topping!
Preventing Weeping in Your Fluffy Meringue Topping
Weeping—those little beads of sugary water forming on your meringue swirls—is the absolute worst, isn’t it? It usually happens when the meringue cools down too fast, especially in the fridge. The sugar and moisture separate when shocked by cold temperatures. My absolute golden rule here is to let this pie cool down slowly, completely, right on the counter away from drafts. If you must store it, cover it loosely with plastic wrap *after* it has cooled to room temperature, and try to eat it within 24 hours for the best texture.
Ingredient Prep for the Easy Lemon Meringue Recipe
For every single meringue recipe—easy or gourmet—the bowl has to be your best friend. I mean it: wipe down your mixing bowl and whisk attachment with a paper towel dipped in white vinegar or lemon juice before you add the egg whites. Any tiny speck of fat, from residual oil to residual yolk, will stop those whites from ever reaching their full potential. Also, don’t skimp on that lemon zest! I always zest the lemons before I juice them, because that bright flavor is what makes this an easy lemon meringue recipe worth making the entire thing from scratch.
Storage and Serving Suggestions for Your Lemon Meringue
This stunning, towering pie is definitely best enjoyed the day you make it! That fluffy meringue topping really starts to soften up after about 24 hours, even when stored perfectly. If you have leftovers, the best spot is actually on the counter, loosely covered with plastic wrap, not the fridge.
Here’s the secret: putting it straight into the cold fridge encourages that weeping we talked about. If you *must* chill it longer, cover it well and eat it within two days, although the texture won’t be quite as spectacular.
We always serve big wedges slice with a cup of something comforting. The bright citrus cuts through richer flavors so beautifully. A warm cup of tea, like my favorite Iced London Fog Latte, is just the perfect companion to this very sweet and tart dessert.
Variations on the Lemon Meringue Theme
You know, once you master the classic, you start seeing this bright lemon flavor everywhere! This recipe is so adaptable, which means you can easily turn it into smaller, more elegant individual desserts or play around with the topping. It’s fun to switch things up for parties or just when you get bored!
Making Mini Lemon Desserts
If you’re having a big gathering and don’t want the fuss of slicing a huge pie, this filling is fantastic in smaller forms. You can press your crust recipe into little mini tart shells—the kind you bake first—or even scoop the filling into muffin tins lined with parchment for perfect little portions. They come out looking so professional, like something you’d get at a fancy pastry shop!
Alternative Toppings for a Zesty Citrus Bake
While I adore that bakery-brown baked meringue, sometimes I don’t want to fuss with the oven again after the filling is already hot. My shortcut? Lightly torching the topping with a kitchen torch! It gives you that beautiful color and toasted marshmallow flavor in seconds. Another yummy idea, especially if you top the pie with slightly sweetened, toasted coconut flakes for a tropical twist on this zesty citrus bake. I actually use a similar trick when making my bright lemon bars for a different texture profile!
Frequently Asked Questions About Making Lemon Meringue Pie
You know, making something this legendary always brings up questions! Even after baking a dozen of these beauties, I still run into little hiccups, so I totally get why you might have some concerns about your classic lemon pie or your specific lemon curd recipe.
Can I use a store-bought crust for my classic lemon pie?
Oh, absolutely! If you’re short on time, please don’t let an amazing pie pass you by just because you don’t want to make the dough. Using a good quality, pre-baked, store-bought crust is totally fine here. Just make sure it’s fully cooled—and I mean stone cold—before you pour in that hot filling. That said, I’m always going to recommend my homemade version because the buttery, flaky texture really supports the sweet and tart dessert filling so much better than anything pre-made!
Why did my lemon curd recipe separate after cooling?
This is the pits, isn’t it? When your lemon curd recipe looks grainy or seems to have split, it’s almost always because of how we handled the egg yolks. If you add the hot sugar mixture to the yolks too fast, you essentially scramble them a little bit, and that breaks the emulsion. Or, if you overcook the mixture after tempering, it can get grainy too. Remember that slow tempering drizzle? That’s your insurance policy against a broken curd. If you’re looking for other bright bakes, check out my tangy lemon bars post!
How long does the finished lemon meringue last?
Here’s the hard truth about this beautiful creation: the longer it sits, the sadder the meringue gets. For the absolute best experience, where you still get that fluffy meringue topping and zero weeping, you need to eat it within 12 to 24 hours. Store it on the counter, loosely covered, not in the fridge. If you have leftovers past that 24-hour mark, you can pop the whole thing in the fridge, but the meringue will definitely start to deflate and weep a bit. It will still taste great, but it won’t look like the showstopper that just came out of the oven!
Estimated Nutritional Information for This Lemon Meringue Recipe
Everybody asks about the numbers, and honestly, when you’re making something this indulgent, you just have to accept that it’s going to be a treat! I’ve put together the estimated nutritional breakdown below so you know exactly what you’re serving up. This is based on 8 generous slices of that sweet and tart dessert we just made. Remember, since we’re making everything entirely from scratch—from the crust to the lemon curd recipe—these numbers can shift a little bit depending on the exact butter and sugar you use.
This whole process is about indulgence, but it’s homemade goodness, which always tastes way better than anything store-bought, right?
- Serving Size: 1 slice
- Calories: 380
- Fat: 18g (About 7g Saturated Fat)
- Carbohydrates: 55g
- Sugar: 45g
- Protein: 6g
- Sodium: 150mg
So yes, it has sugar, that 45g comes mostly from the filling and the fluffy meringue topping, but look at that protein and how low the sodium is compared to packaged stuff! It’s all about balance, my friends. Just make sure you eat it the day it’s made for the best experience!
Share Your Lemon Meringue Success
Whew! You did it! You conquered the classic lemon meringue pie, and I am so proud of you for tackling this real showstopper.
Now that you’ve experienced that incredible sweet, tart flavor combination that only a scratch made meringue can deliver, I absolutely need to hear about it! Don’t be shy—jump down to the comments below and give this recipe a quick rating. Were those meringue swirls as high as mine? Did the filling set perfectly? Tell me everything!
And please, if you took a photo of your glorious, towering lemon meringue pie—especially if it’s sitting out on the counter waiting for that first magical slice—share it! Tag me on Instagram or wherever you’re sharing your baking triumphs. Seeing your success makes all the testing and recipe crafting worth it. If you’re looking for even more easy citrus magic after tackling this one, you might want to look at my easy lemon meringue recipe for a less fussy spin!
Print
Classic From-Scratch Lemon Meringue Pie
- Total Time: 65 min
- Yield: 8 servings
- Diet: Vegetarian
Description
A recipe for a classic lemon meringue pie featuring a homemade crust, tangy lemon curd filling, and a tall, fluffy meringue topping.
Ingredients
- 1 recipe for 9-inch pie crust, baked
- 1 1/2 cups granulated sugar
- 1/4 cup cornstarch
- 1/4 teaspoon salt
- 1 1/2 cups water
- 4 large egg yolks, lightly beaten
- 1/2 cup fresh lemon juice
- 1 tablespoon lemon zest
- 2 tablespoons unsalted butter
- 6 large egg whites, room temperature
- 1/2 teaspoon cream of tartar
- 1/2 cup granulated sugar (for meringue)
Instructions
- Prepare the pie crust and bake it according to your preferred recipe. Let it cool completely.
- For the lemon filling, whisk together 1 1/2 cups sugar, cornstarch, and salt in a medium saucepan.
- Gradually whisk in the water until smooth. Cook over medium heat, stirring constantly, until the mixture thickens and boils. Boil for one minute, stirring. Remove from heat.
- In a separate bowl, whisk the egg yolks. Slowly temper the yolks by whisking about one cup of the hot sugar mixture into the yolks.
- Pour the tempered yolk mixture back into the saucepan with the remaining hot mixture. Cook over medium heat, stirring constantly, until the filling returns to a boil and thickens. Do not let it boil vigorously.
- Remove from heat. Stir in the lemon juice, zest, and butter until the butter melts. Pour the hot filling into the cooled pie crust.
- For the meringue, place the egg whites and cream of tartar in a clean, grease-free mixing bowl. Beat with an electric mixer on medium speed until soft peaks form.
- Gradually add the remaining 1/2 cup sugar, one tablespoon at a time, beating well after each addition. Increase speed to high and beat until stiff, glossy peaks form.
- Spread the meringue over the hot lemon filling, making sure the meringue touches the edge of the crust all around to prevent shrinking. Create decorative swirls with the back of a spoon.
- Bake at 350 degrees F for 12 to 15 minutes, or until the meringue is lightly golden brown.
- Cool the pie completely on a wire rack at room temperature for at least 4 hours before slicing. Avoid placing it in the refrigerator immediately, as this can cause the meringue to weep.
Notes
- Use fresh lemon juice for the best tangy flavor.
- Ensure your mixing bowl for the meringue is completely clean and dry; any trace of fat will prevent the egg whites from whipping properly.
- Bake the meringue immediately after spreading it over the hot filling for the best texture.
- Prep Time: 30 min
- Cook Time: 35 min
- Category: Dessert
- Method: Baking
- Cuisine: American
Nutrition
- Serving Size: 1 slice
- Calories: 380
- Sugar: 45
- Sodium: 150
- Fat: 18
- Saturated Fat: 7
- Unsaturated Fat: 11
- Trans Fat: 0
- Carbohydrates: 55
- Fiber: 1
- Protein: 6
- Cholesterol: 110


Comments are closed.