

There’s just something about a bubbling, fruit-filled dessert that feels like a warm hug, isn’t there? When I first started cooking seriously, I always thought cobblers were for experienced bakers—intimidating, fussy things. Well, folks, I was wrong! This recipe for the **Easiest Mixed berry cobbler** with Biscuit Topping is the one that changed everything for me. It’s truly my secret weapon for last-minute gatherings or just a quiet Tuesday night when I need serious comfort food. The magic here is how versatile it is; it sings whether you use berries fresh out of the market or straight from the freezer bag. This simple **berry cobbler** always reminds me of my Uncle’s restaurant—the smell of fruit baking always brings me right back to that chaotic, happy kitchen in Texas.
Why This Easy Berry Cobbler Recipe is Your New Favorite Comfort Food Desserts
If you’re looking for that perfect sweet ending that doesn’t require hours of fuss after a long day, this is it. I truly believe this is the **best berry cobbler** you’ll ever throw together. It hits all the right notes for comfort and ease!
- It’s incredibly fast! Prep time is under 15 minutes, making it a fantastic last-minute dessert idea.
- It’s a total kitchen chameleon. You just toss in whatever berries you have on hand.
- It uses that wonderful, fluffy biscuit topping that just melts when you put vanilla ice cream on it.
- If you want to see how we made apple cobbler look this easy, check out my recipe for apple cobbler recipe sometime!
Perfect for Fresh Berry Dessert or Frozen Berry Cobbler Ideas
This is where this recipe really shines as a **simple baking recipe**. You don’t have to run to the store fussing over peak-season fruit. If you’re grabbing frozen berries—which are perfect for those cold nights when you crave a **warm berry dessert**—do not thaw them first! Just mix them in frozen, and trust me, they’ll work out their differences in the oven. It’s fantastic for any **fresh berry dessert** you dream up.
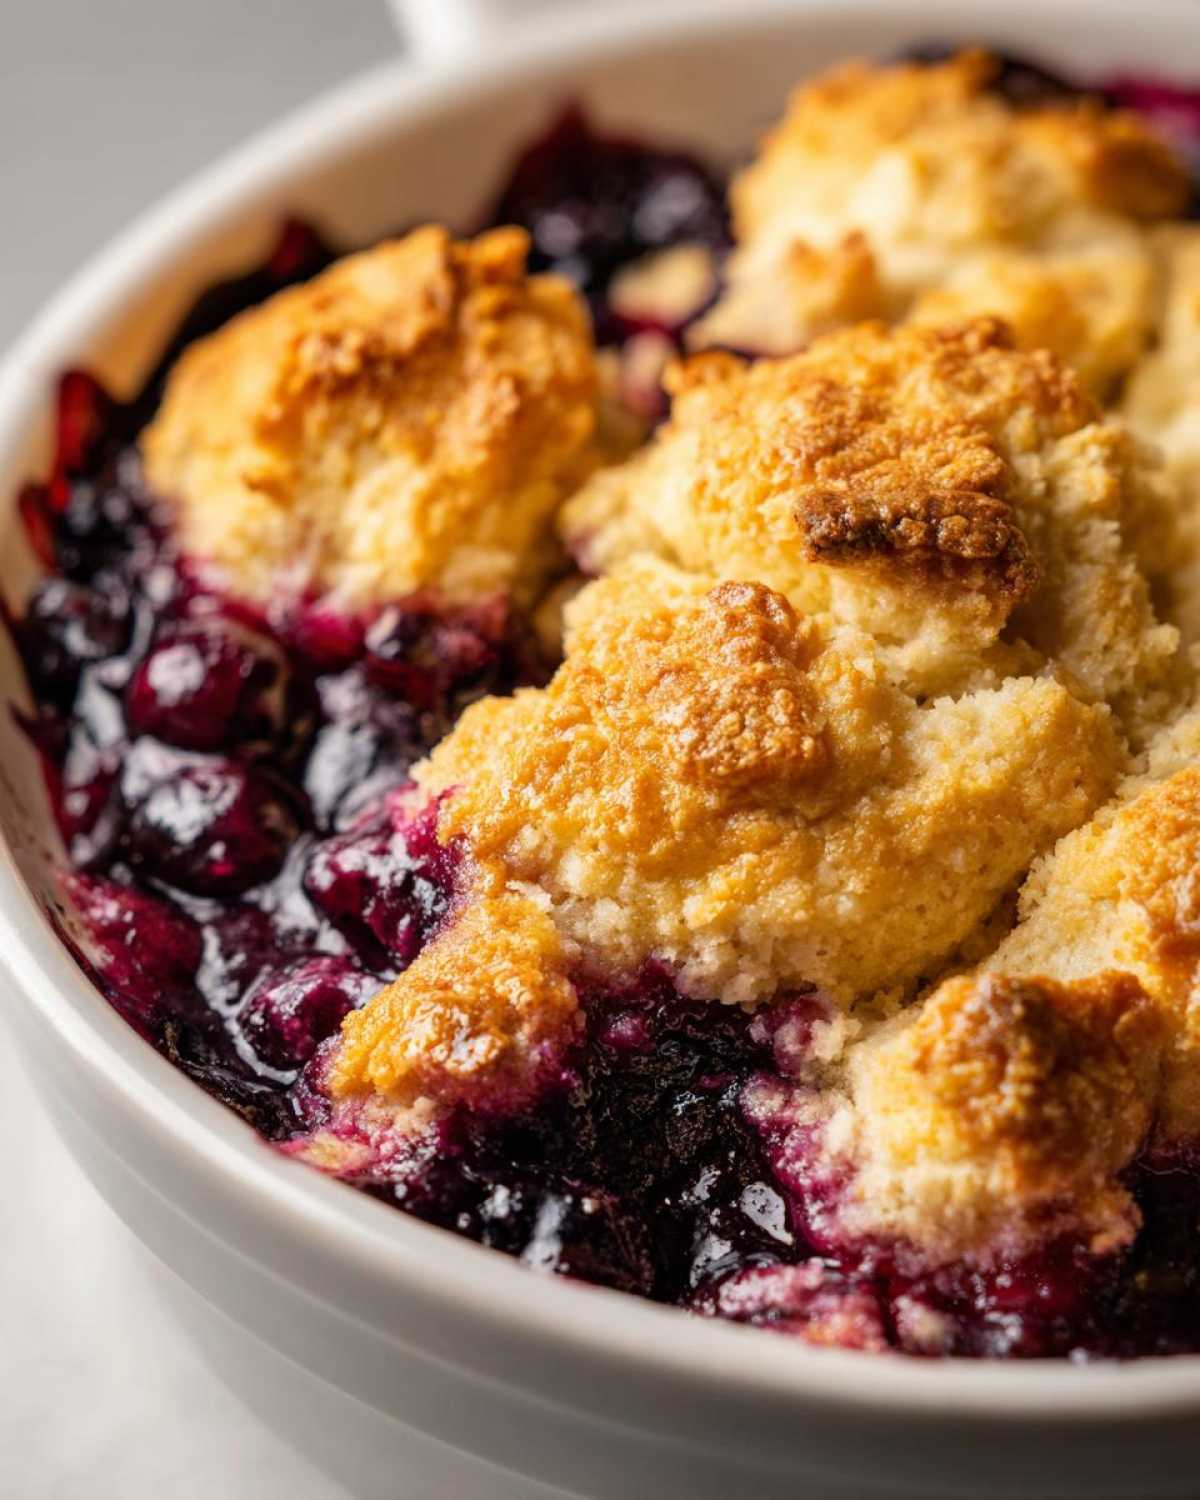
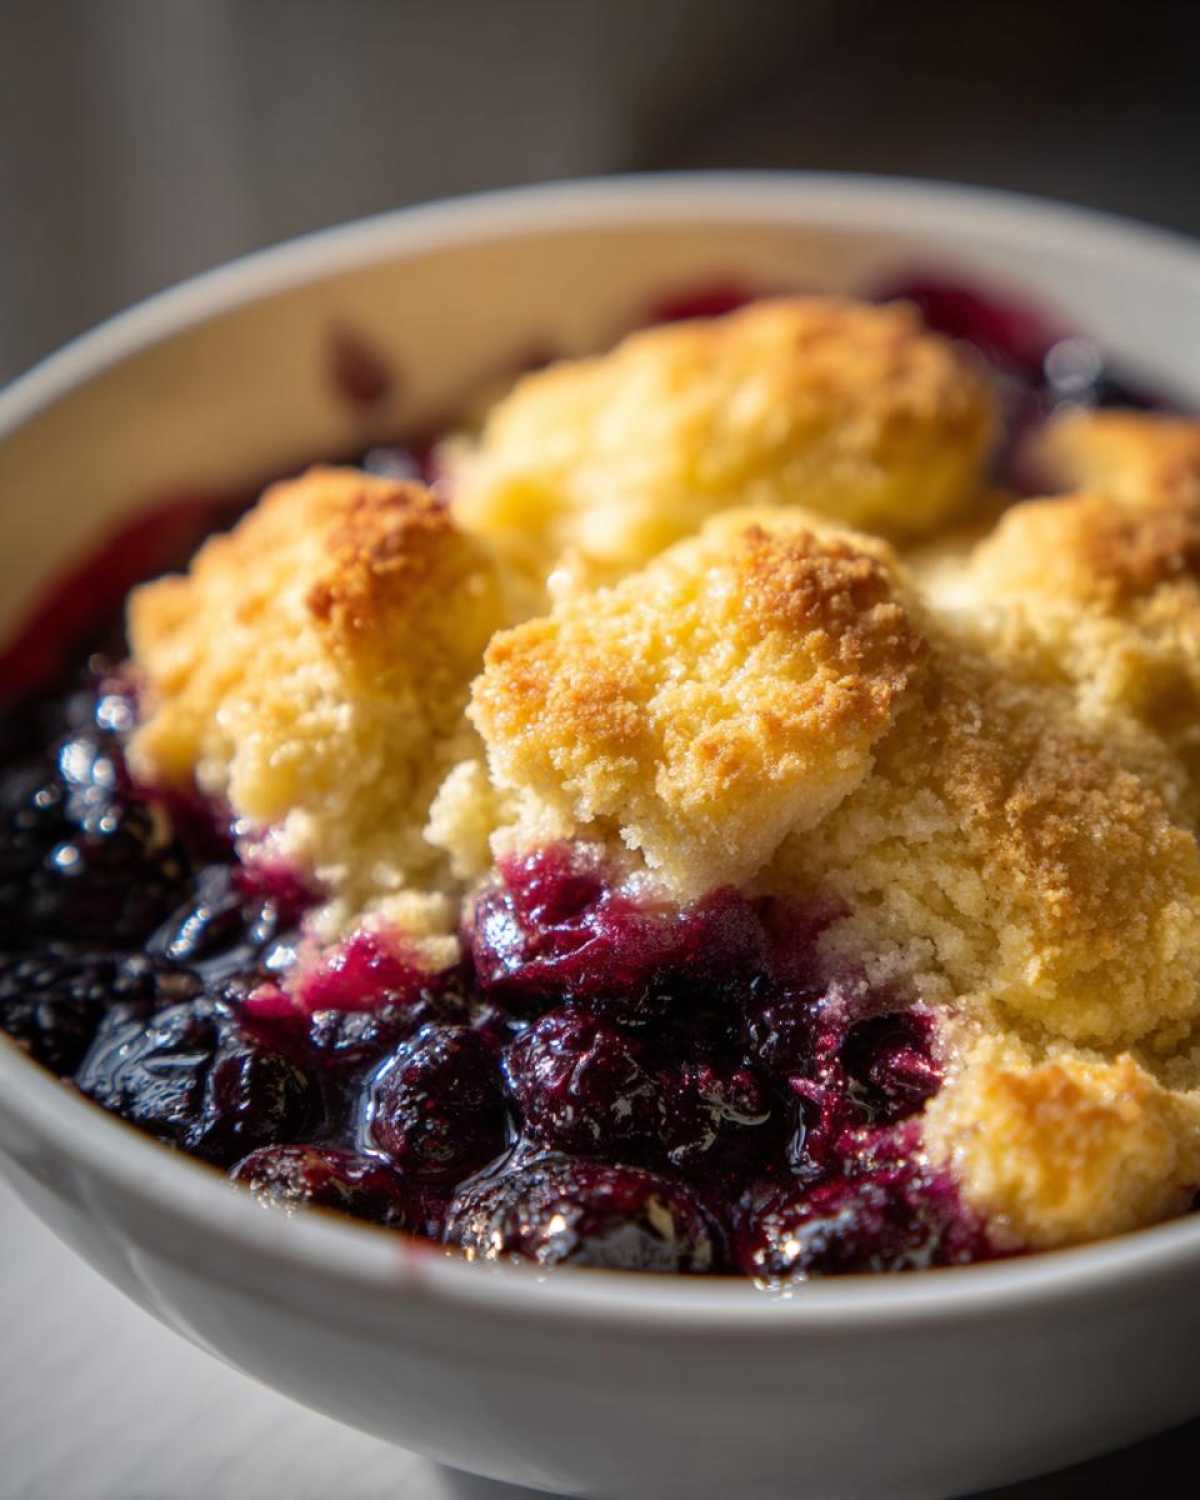
The Classic Cobbler with Biscuit Topping Texture
Forget those overly sweet, stiff toppings you sometimes find. We’re going for a true Southern Style **cobbler with biscuit topping**. Unlike a crumble, which uses a streusel topping, this one bakes up golden, slightly soft, and cakey right where the heat hits it. It’s rich, biscuit-like, and oh-so-tender.
Gathering Ingredients for Your Homemade Cobbler with Biscuit Topping
I always tell folks that a great result starts with prepping your ingredients right. For this **berry cobbler**, the separation between filling and topping is key, especially when it comes to butter temperature. My biggest tip for that fluffy biscuit is simple: everything must be COLD! Don’t even think about using warm butter here, or you’ll end up with something closer to a pancake!
For the Mixed Berry Cobbler Filling
Keep this part super easy. You need six cups worth of whatever berries are calling your name. If you’re not using fresh berries, the frozen ones work just as beautifully. We toss these with sugar to help draw out those lovely juices.
- 6 cups mixed berries (fresh or frozen)
- 3/4 cup granulated sugar
- 2 tablespoons cornstarch
- 1 tablespoon lemon juice
- 1/2 teaspoon vanilla extract
For the Biscuit Topping
This is where you want to move fast! Get that butter cut small and keep it frigid. When you cut in the butter, you’re trying to create those lovely little pockets that turn into flaky layers when they hit the oven heat. We need a binder, too, so we’ll whisk the egg separately for the wash.
- 1 1/2 cups all-purpose flour
- 2 tablespoons granulated sugar (for topping)
- 1 tablespoon baking powder
- 1/2 teaspoon salt
- 6 tablespoons cold unsalted butter, cut into small pieces
- 1/2 cup milk
- 1 large egg, beaten (for egg wash)
- 1 teaspoon coarse sugar (for sprinkling)
Step-by-Step Instructions for the Berry Cobbler
Okay, let’s get down to business. This isn’t a three-day project; we’re aiming for that golden, bubbly goodness without stress. Remember how I mentioned needing a good crust technique for flaky results? Well, the biscuit topping uses a similar principle. You’ll want to make sure your cold butter is really cold before you start cutting it in. I actually keep my milk and butter in the freezer for about 10 minutes before I start mixing, just to ensure they stay icy!
Preparing the Oven and Berry Filling
First things first: get that oven preheating to 375°F (190°C). We want it nice and hot when the berries go in. While it heats up, grab your mixing bowl for the filling—that’s where the 6 cups of glorious mixed berries hang out. Gently toss them with the 3/4 cup of sugar, the cornstarch (that’s our thickener so it doesn’t turn into soup!), the lemon juice, and vanilla. Be gentle! We want whole berries, not purple mush.
Once they’re coated, pour that beautiful mix into your greased 8×8 inch dish. Spread it out so it bakes evenly. It should look wonderfully vibrant already!
Creating the Biscuit Berry Cobbler Topping
Now for the fun part—the topping! In a separate bowl, whisk your dry topping ingredients: flour, the two tablespoons of sugar, baking powder, and salt. Next up is that crucial step: cutting in the cold butter. You need to use your fingertips or a pastry blender and work that butter into the flour mix until it looks like coarse crumbs, maybe with a few pea-sized bits of butter still hanging out. Those little butter islands are what give us that light, airy lift!
After that, pour in the milk and stir *just* until it comes together into a soft dough. Seriously, stop mixing the moment the dry bits disappear. Overmixing this dough is the fastest way to make your biscuit tough, and nobody wants a tough **berry cobbler** topping!
Assembly and Baking the Berry Cobbler
Take spoonfuls of that soft dough and drop them randomly over the berry base. Don’t try to spread it to cover everything; those gaps are important because that’s where the filling bubbles up through, and it looks so rustic and lovely. Brush those biscuit tops quickly with the beaten egg wash and sprinkle with that coarse sugar for sparkle and crunch.

Bake for about 35 to 45 minutes. You’ll know it’s done when the topping is golden brown, and you see the fruit filling bubbling happily and looking thick underneath the biscuit peaks. Trust me, you’ll smell it before you see it! Don’t even think about touching it yet. Let it rest on the counter for at least 15 minutes after it comes out. That cooling time lets the filling really set up, which is important for any **homemade cobbler recipe**.
For more tips on handling doughs and fats, you might want to check out my guide on easy butter pie crust recipe—it applies right here!
Tips for the Best Berry Cobbler Results
Listen, even with the easiest recipes, sometimes things don’t go exactly as planned, right? That’s okay! When I call this the **best berry cobbler**, I mean it’s robust enough to handle a few rookie mistakes. But if you want to skip the soggy bottom or the dough that didn’t quite rise, I have a few hard-won tips based on years of baking this dessert. These little tricks, which I learned the hard way, will guarantee you get that gorgeous contrast between the bubbly filling and the tender topping every single time.
Handling Frozen Berries in Your Berry Cobbler Recipe
This is a question I get asked constantly since **frozen berry cobbler ideas** are so popular when fresh berries are out of season. My biggest piece of advice for anyone using frozen fruit: Do not thaw them! I mean it. If you thaw them, they start weeping juice all over the bottom of the pan before you even get the topping on, and that leads straight to a soupy mess. Toss them straight from the bag into the sugar coating.
Now, because those frozen berries have ice crystals that need to be cooked off, you must assume you’ll need extra time in the oven. If your topping looks perfectly golden but the middle is still a little liquidy, just tent it loosely with foil and let it bake another 5 to 10 minutes. You want that thick, jammy consistency we talked about. If you want to see how another baker approaches this challenge, check out Julie’s take over at Julie’s Eats & Treats.
Achieving Perfect Biscuit Texture
If you want that flaky, slightly chewy, biscuit-like topping, you must respect the cold. I’m not kidding; if the butter warms up even slightly while you’re mixing, you lose the separation needed for that lift. You aren’t making a pie crust, but the principle is the same: those chunks of cold butter melt in the oven and create steam pockets which is the key to height and tenderness in the topping.
Keep your butter cubed small and, if your kitchen is warm, chill the flour mixture for a few minutes before you cut in the butter. Another secret for extra tenderness? I sometimes substitute half of the regular milk with heavy cream—it adds just a little extra fat richness to the biscuit dough. If you are using this, you might also love my recipe for chocolate dipped coconut bars, which relies on good cold fat for structure, too!
Serving Suggestions for a Warm Berry Dessert
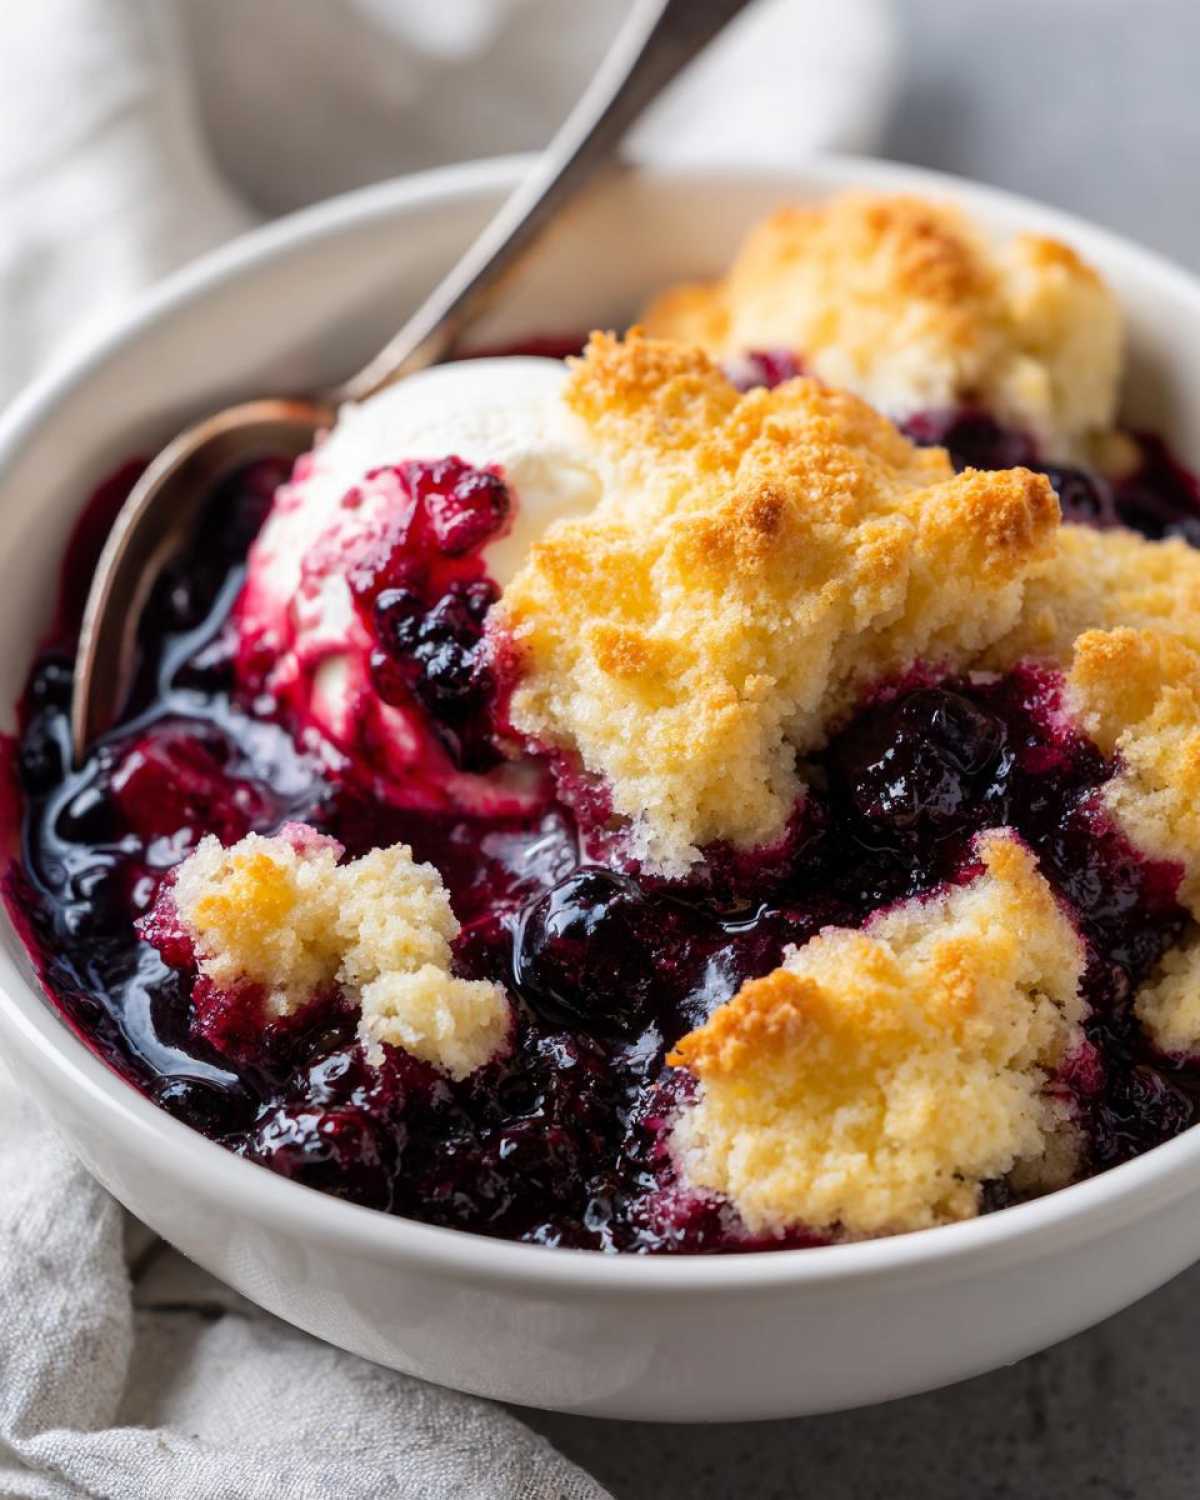
Alright, if you’ve managed to get this glorious, bubbling **berry cobbler** out of the oven, congratulations! You’ve done the hard work. But honestly, eating it straight out of the dish without the proper topping is like listening to a great song but missing the final chorus. This **warm berry dessert** really comes alive when you add that final touch. It’s all about creating that perfect temperature contrast, you know? Hot fruit, cold topping—that’s heaven in a bowl!
The Ultimate Dessert Topped With Ice Cream Pairing
If you take away only one serving tip from me, let it be this: You absolutely *have* to serve this with vanilla ice cream. It is non-negotiable for me! The cold, sweet cream melts into the hot, tart juices of the berries and softens the biscuit topping just perfectly. It’s the ultimate marriage of temperatures and textures. Seriously, grab the best vanilla bean ice cream you can find; it makes all the difference in leveling up this **easy berry cobbler recipe**.
But hey, I’m not totally inflexible! If you’re making this for an afternoon treat instead of a big evening dessert, a generous dollop of homemade whipped cream works beautifully. If you’re feeling extra fancy, a slight drizzle of good, rich caramel sauce right over the top adds a completely different dimension of sweetness that pairs wonderfully with the mixed berries. And if you happen to have made my chocolate dipped coconut bars, maybe sneak a few of those crumbles on top for a textural surprise!
Storage and Reheating Instructions for Leftover Berry Cobbler
One of the best things about a homemade **berry cobbler** is that it always tastes fantastic the next day, though honestly, I rarely have leftovers! If you do manage to save some, keep it covered on the counter for no more than a day if your kitchen is cool. For anything longer, seal it tightly in the fridge; it’ll keep happily for about three or four days.
When you reheat it, please, for the love of all things delicious, skip the microwave if you can! The microwave saves time, sure, but it turns that glorious biscuit topping instantly mushy. Pop a serving or two on a baking sheet, cover it loosely with foil, and heat it in a 325°F oven for about 10 minutes until it’s warm all the way through and the topping firms up again. That way, you get that fresh-baked texture back!
Frequently Asked Questions About This Mixed Berry Cobbler
I always find folks have a few last-minute questions popping up once they are standing in front of their mixing bowls, and that’s totally fair! Cooking should feel intuitive, not confusing. Here are the top things I hear about making this **berry cobbler**, so you can feel confident heading into the oven!
Can I make this Simple Baking Recipes Berry Cobbler ahead of time?
You absolutely can! If you want to keep this as a genuine **quick fruit dessert** for a specific time, I suggest prepping everything ahead of time. You can mix the filling and keep it covered in the fridge for up to a day. You can also mix up the dry ingredients for the topping and keep that sealed tight. The trick is, you shouldn’t combine the butter or the milk until the moment you are ready to bake. If you bake it the day before, leftovers are great, just reheat them in the oven like I mentioned earlier so that topping gets crispy again!
What is the difference between a Berry Crumble vs Cobbler?
Oh, that’s a classic question that always comes up when talking about **comfort food desserts**! The big difference is the topping, hands down. A cobbler—like the glorious one we just made—has a biscuit or sometimes a simple batter topping that gets dropped over the fruit, resulting in soft, golden mounds. A crumble (or a crisp) gets a streusel topping made mostly of flour, sugar, butter, and sometimes oats, which bakes up loose and crunchy all over the top. Both are phenomenal, but for that classic, Southern Style feel, the biscuit topping wins for me!
Can I use a different fruit, like just blackberries, for this Triple Berry Cobbler Recipe?
Yes, yes, and yes! If you only have blackberries, or maybe you found perfect peaches, go right ahead. You can definitely adjust this recipe for a **Triple Berry Cobbler Recipe** variation or even a single-berry dessert. The only thing I encourage you to check is the natural sweetness of the fruit you choose. If you are using tart fruit or something with less natural sugar than standard mixed berries, maybe bump that 3/4 cup of sugar in the filling up by about two tablespoons. If you need something bright and zesty to balance out a rich fruit, you might want to peek at my lemon cake recipe for inspiration on balancing flavors!
Nutritional Estimates for Your Berry Cobbler Serving
I’m not a nutritionist, and the figures below are just educated guesses based on standard measurements, so they won’t be 100% perfect! Whenever you use fresh produce or different brands of butter, the final count changes slightly. But this gives you a decent idea for what you’re getting in one satisfying serving size of our **berry cobbler**.
- Serving Size: 1 serving
- Calories: 380
- Sugar: 35g
- Fat: 14g
- Protein: 5g
- Carbohydrates: 62g
Share Your Berry Cobbler Creations!
I truly hope you make this recipe—it’s a keeper, I promise! When you do, I want to see it! Please, try making this **Easy Berry Cobbler Recipe** and drop a rating down below. Five stars means you loved it and it’s going into your weekly rotation, right? If you snap a picture while you are enjoying that warm dessert topped with vanilla ice cream, tag me! I love seeing Forkful Heaven creations out in the world.
And listen, if you’ve tried this cobbler and you’re already itching for another amazing meal, don’t forget to check out my recipe for spaghetti aglio e olio with kale recipe—it’s just as simple and comforting in its own savory way! If you want to see how another baker is tackling those mixed berries, you can peek at what they are doing over at Tasty Fitness Recipes.
If you have any questions while you’re cooking, drop them in the comments! I try my best to get back to everyone because I want this easy **berry cobbler** to be a success in your kitchen just like it is in mine. Happy baking, y’all, and come back soon for more Forkful Heaven!
Print
The Easiest Mixed Berry Cobbler with Biscuit Topping
- Total Time: 55 min
- Yield: 6 servings
- Diet: Vegetarian
Description
Make this simple mixed berry cobbler using fresh or frozen berries for a warm, comforting dessert. The biscuit topping bakes up perfectly golden.
Ingredients
- 6 cups mixed berries (fresh or frozen)
- 3/4 cup granulated sugar
- 2 tablespoons cornstarch
- 1 tablespoon lemon juice
- 1/2 teaspoon vanilla extract
- 1 1/2 cups all-purpose flour
- 2 tablespoons granulated sugar (for topping)
- 1 tablespoon baking powder
- 1/2 teaspoon salt
- 6 tablespoons cold unsalted butter, cut into small pieces
- 1/2 cup milk
- 1 large egg, beaten (for egg wash)
- 1 teaspoon coarse sugar (for sprinkling)
Instructions
- Preheat your oven to 375°F (190°C). Lightly grease an 8×8 inch baking dish or a similar-sized casserole dish.
- Prepare the berry filling: In a large bowl, gently combine the mixed berries, 3/4 cup sugar, cornstarch, lemon juice, and vanilla extract. Mix until the berries are evenly coated.
- Pour the berry mixture into the prepared baking dish, spreading it into an even layer.
- Prepare the biscuit topping: In a separate medium bowl, whisk together the flour, 2 tablespoons sugar, baking powder, and salt.
- Cut in the cold butter using a pastry blender or your fingertips until the mixture resembles coarse crumbs with some pea-sized pieces of butter remaining.
- Pour in the milk and stir just until a soft dough forms. Do not overmix.
- Drop spoonfuls of the biscuit dough evenly over the berry filling. You do not need to cover the entire surface; gaps are fine.
- Brush the tops of the dough pieces lightly with the beaten egg and sprinkle with coarse sugar.
- Bake for 35 to 45 minutes, or until the topping is golden brown and the berry filling is bubbly and thick.
- Let the cobbler cool slightly on a wire rack for at least 15 minutes before serving. Serve warm, ideally topped with vanilla ice cream.
Notes
- If you use frozen berries, do not thaw them first. You may need to add 5 to 10 minutes to the baking time.
- For a richer topping flavor, substitute half of the milk with heavy cream.
- This dessert is excellent served warm with a scoop of vanilla ice cream.
- Prep Time: 15 min
- Cook Time: 40 min
- Category: Dessert
- Method: Baking
- Cuisine: American
Nutrition
- Serving Size: 1 serving
- Calories: 380
- Sugar: 35
- Sodium: 210
- Fat: 14
- Saturated Fat: 8
- Unsaturated Fat: 6
- Trans Fat: 0
- Carbohydrates: 62
- Fiber: 4
- Protein: 5
- Cholesterol: 45


Comments are closed.