
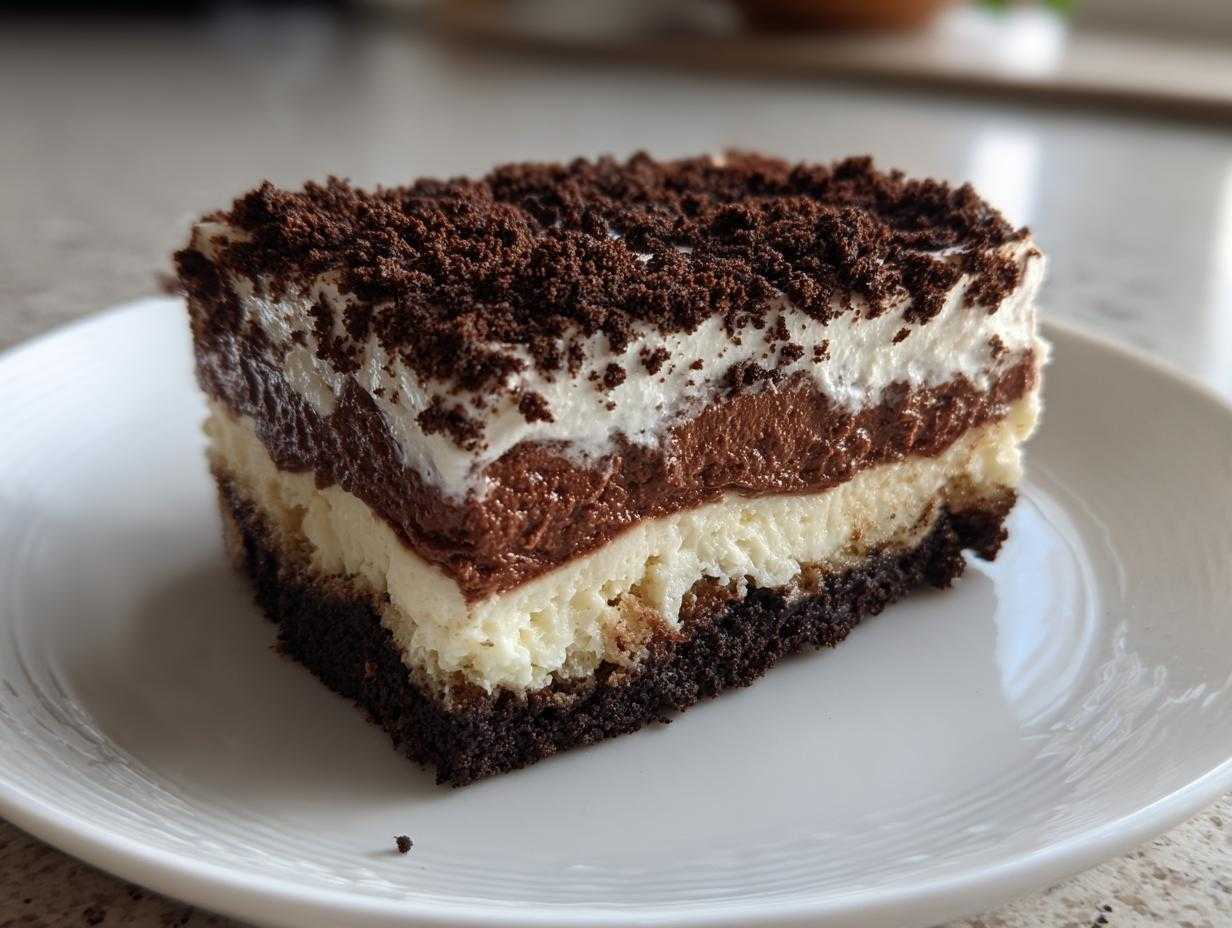
Oh my gosh, are you ready for a blast from the delicious past? Nothing screams ‘fun party’ or ‘lazy Sunday’ quite like a dessert that takes zero oven time and uses up every cookie crumb you have left. I’m talking about the legendary, utterly irresistible **dirt cake**! Seriously, if you grew up anywhere near a potluck in the nineties, you know this one. It’s creamy, it’s crunchy, it’s chocolatey heaven, and that perfect layer of crushed Oreos on top honestly makes me so happy—it just looks like actual, edible dirt!
This is, without a doubt, the easiest no-bake dirt cake recipe you will ever lay eyes on. I first made a version of this when I was maybe twelve, trying to surprise my parents who were out of town, and thankfully, it’s almost impossible to mess up. You need maybe twenty minutes of mixing time, and then the fridge does all the hard work for you. You can check out my Oreo cheesecake jars if you ever want a single-serving twist on a cool, no-bake treat, but for this one, we’re going big in a 9×13 dish. Trust me, once you nail this simple layered crumb dessert, it’ll become your go-to grab-and-go awesome dessert for everything from neighborhood BBQs to movie nights. I’m sticking with the classic cream cheese base because why mess with perfection?
Why This is the Best No Bake Dirt Cake Recipe
I’ve tried fancier desserts, I really have. I’ve tried recipes that use fancy pudding mixes or involve tempering chocolate, but when it comes to real crowd-pleasers, simplicity wins every single time. This classic layering provides that amazing contrast you just can’t beat. It’s why this recipe remains stuck on my fridge door for any last-minute gathering!
- It’s genuinely a No Bake Dirt Cake—no tricky oven temperatures or cooling racks needed!
- The texture is unbeatable; that combination results in the most luxuriously Creamy Dirt Dessert imaginable.
- It’s incredibly fast to pull together, making it perfect for those unexpected Party Desserts No Bake emergencies.
- It holds up beautifully in the fridge for days, which makes it excellent for make-ahead prep.
If you need a guaranteed hit that tastes like childhood in the best way possible, this is it. You’ll never look for another version after trying this one.
Gathering Ingredients for Your Classic Dirt Cake
Okay, look at this list—it’s almost suspiciously short for how amazing the end result is! That’s the beauty of the Oreo Dirt Cake Recipe. You probably have half of this stuff sitting in your pantry right now. The most important star here, obviously, are those Oreos. Don’t skimp here; we need the real deal for that perfect, dark crumb texture. You’ll need a full package of them, and trust me, you need to crush them *well* for the best “dirt.”
The other key things: make sure that eight ounces of cream cheese is genuinely softened—no shortcuts there, or you’ll end up with lumps! Also, grab the instant pudding mix, not the cook-and-serve kind; that instant set is what keeps this a proper No Bake Dirt Cake. We want that smooth, dreamy texture! If you want to peek at other super quick, two-ingredient delights, I have this amazing Nutella mousse that uses similar minimal effort.
Here’s what you’ll need to pull together this dreamy Chocolate Cream Dessert:
- One big package (about 14.3 oz) of Oreo cookies—you’ll crush almost all of these!
- A half cup of simple unsalted butter, melted down slightly.
- Eight ounces of cream cheese, make sure it’s soft when you go to mix it.
- One cup of powdered sugar to sweeten that creamy middle layer.
- One 12-ounce container of frozen whipped topping (Cool Whip works great), and you must let it thaw first!
- Two boxes (the small 3.9 oz size) of instant chocolate pudding mix.
- Three cups of nice, cold milk—this helps the pudding set up fast!
- And the fun part: Gummy worms! They aren’t mandatory, but honestly, where’s the fun in dirt without worms?
Step-by-Step Instructions for Easy No Bake Dirt Cake
Alright, let’s get cooking—or rather, let’s get *not* cooking! This is where the magic of making a proper dirt cake happens, and I promise it’s foolproof. We need to build this dessert in solid, distinct layers so everything stays perfectly tidy until it hits the plate. Remember, you want patience here, especially when it comes to that chilling time later; that’s what transforms a pile of ingredients into a sliceable, creamy dessert. If you’re planning a big party, these steps are totally doable ahead of time, which is why I keep this recipe in my rotation of make-ahead delights!
Preparing the Oreo Crumb Crust for Your Dirt Cake
First things first: the dirt! Take those Oreos and crush them down until they look exactly like fine potting soil. You don’t want huge chunks wobbling around in your crust. Once they’re crumbly, mix that cup of crumbs with your melted butter. Press this buttery mixture *firmly* into the bottom of your 9×13 dish. I mean it—press it down good and solid! This layer needs to hold up the next two layers, so give it some muscle! Pop that dish into the freezer for about ten minutes just to set it up nice and fast.
Creating the Creamy Layers of the Dirt Cake
While the crust chills, grab your softened cream cheese and beat it up with all that powdered sugar until it’s totally smooth. Don’t leave any little lumps behind; nobody wants a cheesy lump in their dirt cake, right? Then, take *half* of your thawed whipped topping and gently fold it in. I said *fold*, not beat! We are trying to keep all that lovely air in there for a light texture. Spread this mixture slowly and carefully over your chilled crust. Then move to your pudding—whisk the two packets of instant pudding mix with the cold milk vigorously for two minutes until it starts looking thick. Let that sit for five minutes, then gently spread it over the cream cheese layer. Gentle is the keyword here to keep the layers separate!
Assembling and Chilling the Final Dirt Cake
Now for the grand finale of assembly! Take the remaining half of your whipped topping and spread that over the pudding layer. It should look like a perfectly white cloud resting on chocolate. Next, sprinkle that cup of reserved crushed Oreos over the top—this is the final layer of “dirt.” Once that’s done, if you’re feeling fun, press those gummy worms in until they look like they’re trying to escape! Here’s the most critical part, though: You absolutely must chill this dirt cake for a minimum of four hours. Honestly, overnight is even better. That time allows the pudding to set completely, ensuring your layers don’t slide when you slice it. It turns from a puddle into paradise!

Tips for Making the Absolute Best Dirt Cake
Even though this is a super simple recipe, there are a couple of little things I’ve learned over the years that turn a *good* dirt cake into the *best* one out there. Trust me, you want the texture to be perfect—not watery, not crumbly, but perfectly creamy from top to bottom. That starts before you even turn on the mixer!
First, let’s talk about that cream cheese. If it’s cold, those lumps will haunt your dessert! Make sure that cream cheese is really soft, maybe sitting out for a full hour if your kitchen is chilly. If you try to beat cold cream cheese with powdered sugar, you end up with a stiff mess rather than a smooth base for your layers. Second, when you’re folding in the whipped topping to both the cream cheese layer and later when layering the pudding, be gentle! We worked hard to get air into that topping, and if you mix too aggressively, you deflate it, and suddenly your dessert is heavy, not light and dreamy. This careful technique is part of what makes this the Best Dirt Cake Recipe.
Finally, and this is non-negotiable for an all-star result: Do not rush the chilling time. I know you want to dive in right when you sprinkle those last gummy worms, I really do! But that minimum of four hours is essential for the instant pudding to completely grab onto the milk and firm up. If you serve it too soon, the pudding layer will ooze into your cream cheese layer, ruining the beautiful separation we worked so hard to create. Look, if you love secret ingredients, you might want to check out my avocado chocolate mousse recipe for a surprisingly decadent twist on chocolate!
Variations on the Classic Dirt Cake Dessert
While I stand by the fact that the classic version is truly unbeatable—that combination of cream cheese and chocolate pudding is just magic—I totally get wanting to shake things up now and then! Don’t worry, there are so many simple ways to jazz up our beloved dirt cake without making it complicated. This lets you tailor it for anyone’s preference, making it an even more unique Delicious Dirt Dessert.
My favorite little trick for an adult crowd is adding a teaspoon of espresso powder right into the dry instant chocolate pudding mix before you whisk it with the milk. It doesn’t make it taste like coffee, per se, it just deepens that chocolate flavor so intensely that people ask what secret ingredient you used! Wow, it’s so good. If you like playing with rich chocolate dips, you might also enjoy my recipe for Chocolate Hummus Dessert Dip.
Another fun swap is changing out the pudding entirely! If you swap one box of chocolate pudding for cheesecake pudding mix—and maybe add a bit of lemon zest to that cream cheese layer—you get this incredible “Black Forest” feeling without any of the baking fuss. Or, how about making a Mocha variation? Just use white chocolate pudding and add a splash of Kahlua to the milk when mixing it in! Easy peasy ways to reinvent the wheel.
Serving Suggestions for Your Layered Crumb Dessert
Once this amazing dirt cake has chilled properly, the only question left is how to serve this incredible Simple Layered Cake! While serving it straight out of the 9×13 dish with a big scoop works perfectly for casual settings, I love making little individual servings sometimes. If you use small clear plastic cups or mason jars, you can really show off those distinct layers we worked so hard to keep separate—the crumb crust, the white cream cheese layer, the dark pudding, and that final dusting of dirt.
It’s always a huge hit when I put the cups out on a tray! They look so cute when you stick a single gummy worm right out of the top of each one. This dessert is rich, so a small portion goes a long way. I usually serve it with a nice, hot cup of coffee—the bitterness of the coffee really cuts through that sweetness perfectly. If you are looking for other easy, compact treats, you might want to check out my thoughts on Tahini Chocolate Chip Cookies for another crowd-pleaser.
Storage and Make Ahead Tips for Dirt Cake
One of the best parts about making this incredible dessert? It absolutely loves being made ahead of time! This makes it the champion of Make Ahead Desserts because you can completely finish it the day before your event, and it just gets better overnight as the layers mingle just a tiny bit. Planning ahead means you get to enjoy the party, too, right?
To store leftovers—and I mean *if* you have any left—you need to cover that dish tightly with plastic wrap. Make sure the plastic doesn’t touch the whipped topping layer if you can help it; you don’t want any condensation sticking to your final layer of “dirt.” This dirt cake stays perfectly fresh, creamy, and delicious in the refrigerator for up to three days. Seriously, that pudding and cream cheese base is sturdy!
If you’re freezing it, that’s a bit trickier because of the whipped topping. I’ve done it successfully by covering the dish in plastic wrap and then a layer of foil, making sure it’s airtight. It thaws out nicely overnight in the fridge, though the texture might be slightly softer than when freshly made. If you’re curious about other easy things you can prep ahead, I made some amazing chocolate bark last week that’s perfect for making a day ahead!
Frequently Asked Questions About Oreo Dirt Cake Recipe
I get asked the same few questions about this dessert all the time! It’s funny how a dessert this simple can spark so much curiosity. Usually, people are worried about the texture or trying to sneak in a shortcut. Let’s tackle these head-on so you can feel confident making the most perfect batch of dirt cake for your next get-together. I used a couple of links here in case you’re looking for other quick dessert inspiration, like my easy Nutella mousse!
Can I use homemade chocolate pudding instead of instant pudding in this dirt cake?
Oh, I sure hope you don’t try that if you want this to set right! See, this recipe depends entirely on the quick-setting magic of the instant pudding mix, especially since it’s a no bake dirt cake. If you make homemade pudding from scratch, it’s usually cooked on the stovetop, and it sets differently. It tends to stay softer and runnier, meaning when you spread it over that cream cheese layer, it’ll just bleed right into it. You won’t get those defined layers we are looking for, and frankly, it could end up a soupy mess. Stick to the instant packets, please—they are your structure builders!
What is the best way to crush Oreos for the dirt cake topping?
This is a huge quality-of-life question! If you want that fine, dusty look that really sells the “dirt” effect, the absolute fastest way is using a food processor. Give those cookies a good 30 seconds or so in there, and you get perfectly uniform, fine crumbs. That said, if you don’t want to drag out the big machine, you can absolutely use the old-school method! Toss the cookies into a large, sturdy zip-top bag, seal it, and then use a rolling pin or the bottom of a heavy pan to smash them. You have to apply a bit more elbow grease, and the pieces might be slightly less uniform, but it works great every time!
Is this Easy Chocolate Pudding Dessert suitable for very young children?
Yes, absolutely! This is one of those classic Kid Friendly Desserts that everyone usually loves. The texture is soft, there are no sharp edges, and it’s just pure chocolate sweetness. I usually make a separate batch just using milk (no coffee or alcohol flavorings!) for my little nieces and nephews. The only piece of caution I have is just about the sugar content, obviously—it’s a treat, not a daily meal! And sometimes the gummy worms can be a bit sticky, so keep an eye on them while they enjoy their fun dessert!
Nutritional Estimates for This Creamy Dirt Dessert
Now, I am definitely not a registered dietitian, so please take these numbers with a giant grain of salt—or maybe a giant sprinkle of our Oreo dirt! Since this is a comfort dessert, it’s definitely meant for enjoying in moderation, not for counting daily macros, you know? But for those of you who like to keep an eye on things, here is what my testing generally shows for one serving of this delicious, rich dessert. These estimates are based on using standard store-bought ingredients, including the whipped topping.
If you make substitutions—like using low-fat cream cheese or trying sugar-free pudding—these numbers will obviously change quite a bit. I always recommend checking your specific product labels if you are worried about things like sugar or fat content. If you’re trying to balance out a sweet treat like this, maybe try pairing it with something lighter, like my famous avocado chocolate mousse next time for a slightly greener option!
- Serving Size: 1 serving
- Calories: About 350
- Sugar: 35g
- Sodium: Around 310mg
- Fat: 19g total (with about 10g saturated fat)
- Carbohydrates: Roughly 45g
- Protein: About 4g
It’s a rich dessert, for sure, but it’s so worth it when you’re looking for that perfect, nostalgic sugar rush!
Print
Easy No-Bake Oreo Dirt Cake
- Total Time: 4 hr 20 min
- Yield: 12 servings
- Diet: Vegetarian
Description
A simple, creamy, no-bake layered dessert made with crushed Oreos, chocolate pudding, and whipped topping, perfect for parties.
Ingredients
- 1 package (14.3 oz) Oreo cookies
- 1/2 cup unsalted butter, melted
- 1 package (8 oz) cream cheese, softened
- 1 cup powdered sugar
- 1 container (12 oz) frozen whipped topping, thawed
- 2 packages (3.9 oz each) instant chocolate pudding mix
- 3 cups cold milk
- Gummy worms for garnish (optional)
Instructions
- Crush all Oreo cookies until they resemble fine dirt. Set aside 1 cup of the crumbs for topping.
- Mix the remaining crushed Oreos with the melted butter. Press this mixture firmly into the bottom of a 9×13 inch baking dish. Place the dish in the freezer for 10 minutes.
- In a large bowl, beat the softened cream cheese and powdered sugar together until smooth. Fold in half of the thawed whipped topping until just combined. Spread this cream cheese layer evenly over the chilled crust.
- In a separate bowl, whisk together the instant chocolate pudding mix and cold milk for 2 minutes until it begins to thicken. Let it stand for 5 minutes.
- Gently spread the chocolate pudding mixture over the cream cheese layer.
- Top the pudding layer with the remaining half of the whipped topping, spreading it evenly.
- Sprinkle the reserved 1 cup of crushed Oreo crumbs over the top layer.
- If using, press gummy worms into the top layer to resemble worms coming out of the dirt.
- Chill the dirt cake for at least 4 hours, or preferably overnight, before serving.
Notes
- You can make individual servings by layering the ingredients in small cups instead of a large dish.
- For a richer flavor, substitute 1/2 cup of the milk with strong cold coffee when making the pudding.
- If you do not have a 9×13 dish, this recipe works well in a large trifle bowl for a layered presentation.
- Prep Time: 20 min
- Cook Time: 0 min
- Category: Dessert
- Method: No Bake
- Cuisine: American
Nutrition
- Serving Size: 1 serving
- Calories: 350
- Sugar: 35
- Sodium: 310
- Fat: 19
- Saturated Fat: 10
- Unsaturated Fat: 9
- Trans Fat: 0
- Carbohydrates: 45
- Fiber: 1
- Protein: 4
- Cholesterol: 35


Comments are closed.