

There is genuinely nothing better than tearing into a piece of bread fresh from the oven, and I mean *truly* fresh. Store-bought pita bread always seems to disappoint me eventually; it’s either too dense or it crumbles the second you try to stuff it. That’s why I had to nail my own homemade pita bread recipe. I remember the first batch I ever made—I followed directions to the letter, crossed my fingers, and when I pulled them out, they *ballooned*! Wow! Getting that perfect, airy pocket is the ultimate goal, and I’m so excited to share that this recipe makes it easy to achieve that fluffy pita bread right on your stovetop or in your oven. Seriously, this is the secret to the best pita bread you’ll ever eat.
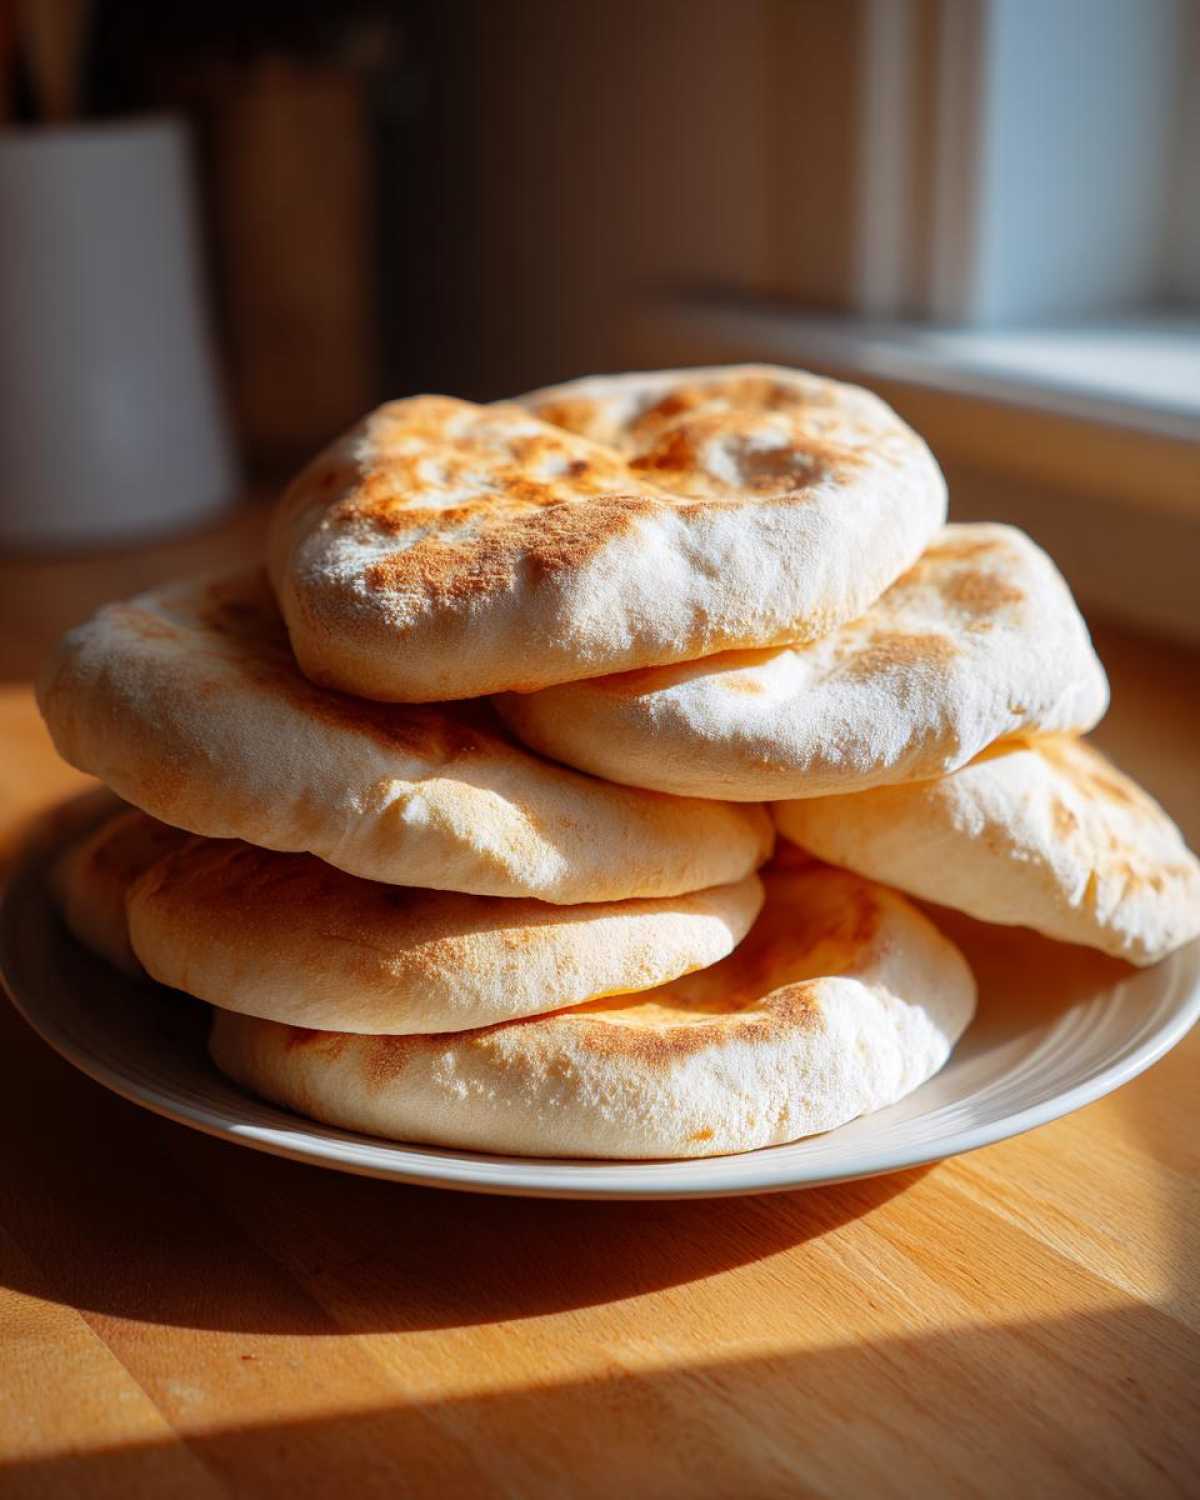
Why This Homemade Pita Bread Recipe Delivers Fluffy Pockets
Look, making bread from scratch can sound intimidating, right? But honestly, this easy pita bread recipe is designed for beginners, yet it still manages to produce that authentic, spectacular puff we all crave. It’s all about making sure the dough has the right *stuff* in it and then giving it the perfect cooking environment. These aren’t just flat rounds; these are honest-to-goodness pouches! If you’re looking for amazing yeast bread recipes that deliver, this is it. I highly recommend checking out my thoughts on simple whole-wheat bread while you wait for this dough to rise!
- The recipe uses the right balance of water and flour, which lets the dough stay incredibly smooth and pliable, which is fantastic for rolling super thin.
- We are relying on simple, active dry yeast—the oldest trick in the book for getting that necessary lift and softness!
It truly shines because it hits all those sweet spots you’re looking for in this type of soft flatbread.
Achieving the Perfect Pita Bread Puff
If you want that pocket, you absolutely need heat, heat, and more heat! The puff happens because the water inside the dough instantly turns to super-hot steam when it hits a scorching surface. That steam has nowhere to go but up, expanding the dough into those gorgeous, hollow pockets. Don’t compromise on preheating that baking sheet or skillet!
Quick Pita Bread Preparation Time
While this does rely on yeast and needs time to rise, the actual hands-on work is super minimal. Your active prep time, kneading it and rolling it out, is just about 35 minutes total—that’s way less time than you’d spend driving to the store! The total time clocks in at around 1 hour and 45 minutes, but most of that is just resting time. It’s a surprisingly quick pita bread fix when you compare it to longer recipes.
Essential Ingredients for Soft Pita Bread
When we talk about making amazing pita bread, the ingredient list is short, but every single item needs to be correct. You don’t need a ton of crazy stuff, which is why this is such a satisfying flatbread from scratch project. We’re using just six things total, but precision matters immensely, especially when dealing with yeast!
For the liquid base, we start with 1 1/2 cups of warm water, and listen closely here—it needs to be between 105 and 115 degrees Fahrenheit. If it’s too cold, your yeast naps; if it’s too hot, you kill it dead. We activate 2 1/4 teaspoons of active dry yeast with just 1 teaspoon of sugar to wake it right up. Then come the dry goods: we need 3 1/2 cups of all-purpose flour, plus whatever you need for dusting later, and 2 teaspoons of salt for flavor depth. Finally, 2 tablespoons of olive oil goes right into the mix to keep everything happy and help that dough stay soft.
Ingredient Notes and Substitutions for Pita Bread
The best advice I can give you for success in any yeast bread recipe is to respect the water temperature when proofing the yeast. If you skip that temperature check, you’re gambling with your rise, and a flat pita is no fun at all. That yeast activation is the entire foundation for getting that beautiful, airy structure in your pita bread!
When it comes to flour, all-purpose works perfectly fine for this recipe, giving you that soft texture. Now, I know some people try using bread flour because it has more protein, and while that might make a chewier final result, I stuck with AP flour here because I felt it gave me that perfect, light chewiness needed for a true Greek-style pita. Don’t feel like you need to substitute unless you really want to experiment! Also, make sure you use standard olive oil, nothing too strongly flavored, as we don’t want it overpowering the subtle bread flavor, especially if you plan to use these for dips.
How to Make Pita Bread Pockets: Step-by-Step Instructions
Okay, let’s get our hands dirty! This is where the magic starts to happen. Watch closely, because how you handle this dough directly impacts whether or not you get those beautiful, hollow centers. Remember, this process is built around making sure our yeast is happy before we even look at the flour. If your yeast works, your pita bread works. It’s that simple! Getting those pockets is seriously satisfying—it reminds me of the time I made tiny little bruschetta bases; precision makes all the difference! Also, if you ever feel like trying a different kind of homemade bread, definitely check out my notes on making crusty Italian bread while you wait for this dough to rise!
Activating Yeast and Mixing Pita Bread Dough
First things first, grab that warm water—remember that sweet spot between 105°F and 115°F?—toss in your yeast and that tiny bit of sugar. Give it a gentle stir and just leave it alone for five to ten minutes. When you come back, it should look foamy, almost like bubbles you see when oil starts to get hot! If it’s not foamy after ten minutes, toss it out and start over with fresh yeast; it means your yeast was sleeping! Once it’s nice and bubbly, stir in your olive oil, and then add in the flour and salt. Mix it all up until it just barely comes together into a shaggy ball. This ensures the foundation of this yeast bread recipe is sound for later!
Kneading and Rising for Fluffy Pita Bread
Turn that shaggy mess out onto a floured counter. Now, we knead! You need to work this dough for about five to seven minutes until it stops feeling sticky and rough. When you press it, it should spring back slowly. That’s how you know it’s smooth and elastic—the key to a fluffy pita bread! Now, find a clean bowl, toss a drizzle of oil in there to coat the bottom, and set your dough ball inside, giving it a little roll so it gets covered too. Cover that bowl tightly with plastic wrap or a damp dish towel and tuck it somewhere warm. It needs 1 to 1.5 hours to double in size. Don’t rush this part; we need that rise!
Baking Instructions for Perfect Pita Bread Pockets
This is the big secret for how to make pita bread pockets: HIGH heat! You need to stick a baking stone or, even better, a sturdy baking sheet right into your oven and preheat it to 475°F (that’s hot!). While that’s preheating, punch down your risen dough and divide it into eight equal pieces. Roll those into little balls and let them rest for just ten minutes so they relax. Then, roll each ball super thin—about 1/8 inch thick and 6 inches wide! Slide two or three rounds right onto that screaming hot surface. They only bake for 2 to 3 minutes until *POOF!* they inflate. Pull them out immediately and stack them up under a clean kitchen towel—keeping them covered traps all that wonderful steam and keeps them incredibly soft and ready for stuffing.

Stovetop Pita Bread Alternative for Quick Results
Now, sometimes you need pita bread immediately, and waiting for that oven to get screaming hot at 475 degrees seems like an eternity! Don’t panic, you don’t have to wait. I absolutely love using the stovetop method when I’m feeling impatient, or honestly, when I just don’t want to heat up the whole house. This technique is fantastic for making warm pita bread super fast, and it still gives you that amazing puff!
For this, you’re going to grab your trusty cast-iron skillet. You might have used my recipe for cast-iron skillet cornbread, and this needs the same level of heat control, but you keep it DRY—no oil in the pan for this one, believe it or not!
Get that heavy skillet over medium-high heat and let it get totally hot before the dough even thinks about touching it. Roll out your pita rounds just like we discussed before, super thin. Toss one round into that hot, dry pan. You won’t have to wait long at all! Within about a minute, you’ll see bubbles start to rise up on the surface of the dough. That’s your cue! Don’t wait for it to turn brown—flip it immediately. The second side usually puffs up even better once flipped, and boom—you have a pocket! Keep a clean kitchen towel handy and keep folding them under it as they come off the skillet to trap that heat and moisture. This is hands-down my favorite way for stovetop pita bread when I need them in a flash!

Tips for Success When Making Homemade Pita Bread Recipe
So, you’ve been patient, you’ve kneaded beautifully, and you pull out a flat, sad disk instead of the puffy cloud you were expecting? Been there, done that, and I’m still slightly annoyed about it years later! This is the number one hurdle for everyone trying the homemade pita bread recipe for the first time, and it boils down almost entirely to temperature control.
If your pita bread doesn’t puff, I promise you, it’s not the dough; it’s the heat! You absolutely must have that baking surface—whether it’s your stone, your sheet, or that cast-iron skillet—preheated for a full 30 minutes, maybe even 45, until it’s radiating intense heat. I rushed my very first batch because I was starving; I slid the dough onto a sheet that felt merely ‘warm’ to the touch. What resulted? Delicious, slightly chewy flatbread, yes, but totally lacking that airy pocket we want for making pita bread for gyros. It was essentially a floppy tortilla!
When I finally committed to that serious preheat, the dough hit the surface and instantly hissed, creating that steam explosion needed for the puff. It went from flat, sad circle to giant pita pillow in about two minutes flat! Trust me when I say that extra waiting time is non-negotiable for achieving that signature bubble.
Another small tip for keeping things soft? As soon as they come out—whether oven or skillet cooked—you must stack them and wrap them immediately in a clean, dry kitchen towel. That towel traps the steam that’s left inside the bread, which is what keeps the texture soft flatbread versus getting stiff or cracker-like as it cools. This little step ensures that the next day, your leftovers are still pliable enough to fold over!
Serving Suggestions for Your Warm Pita Bread
That glorious moment when you pull out a stack of warm pita bread, still soft and smelling yeasty, is when the real fun starts! Because these pitas are so wonderfully light, they are the absolute best vehicle for almost any Mediterranean meal. Planning on dinner? They are perfect companions for dipping into homemade hummus or a creamy baba ghanoush. If you’re making sandwiches, you absolutely have to use these to stuff up some juicy grilled chicken or make incredible falafel pitas—I have an amazing recipe for falafel pitas with tahini sauce that you must try!
But honestly, my favorite way to eat them is just fresh off the pan, split open, and drizzled with a tiny bit of good olive oil and flaky salt. They are so soft they genuinely don’t need stuffing to be delicious!
Storing and Reheating Your Soft Flatbread
So, you managed to make a dozen perfect rounds of pita bread and you have leftovers? Lucky you! But here’s the thing about any great soft flatbread: if you just leave it out on the counter naked, it turns into something you could use for roofing tile by morning. The goal is to keep that delicious steam trapped inside after they cool down, which maintains that wonderful pliable texture we worked so hard for.
The absolute best way to store them is right after they come off the oven or skillet. Stack them up—maybe four or five high—and immediately wrap the whole stack tightly inside a clean, thick kitchen towel. If you plan on keeping them for more than a day, I actually like to put that entire towel-wrapped stack into a sealed Ziploc bag or an airtight container. This keeps any ambient moisture out, but crucially, it keeps the bread’s *own* moisture locked in. They stay perfectly soft like this on the counter for two days, no problem!

Now, let’s talk about reheating because nobody wants room-temperature pita when they’re making a killer gyro! You have two simple options, depending on how much time you have. If you’re using the oven, crank it back up to 350°F. Wrap the pitas back up in foil this time (foil is better for oven reheating) and let them warm through for about 5 minutes. They get wonderfully pliable again.
If you’re going the stovetop route, which is way faster, grab that same dry cast-iron skillet you used for cooking—make sure it’s hot but maybe not scorching like when we first baked them. Lay a pita in there for just 15 to 20 seconds per side. You’ll see it soften immediately. Take it out, and that pita bread is ready to be sliced open or stuffed immediately. It makes all the difference, trust me; it brings that fresh-out-of-the-oven softness right back!
Frequently Asked Questions About Pita Bread
I get so many questions when people try this recipe for the first time, and that’s awesome! It means people are actually baking! Most of the questions seem to revolve around speed and texture, which makes perfect sense when you’re trying to master how to make pita bread pockets at home. Here are the big ones I hear most often from new bakers!
Can I make this pita bread recipe ahead of time?
Yes, you totally can, but you have to choose *when* you want to stop working! For the best possible result, I highly recommend getting through the kneading stage, letting the dough rise (Step 4), punching it down, and then rolling out the balls (Step 5). You can wrap those little dough balls tightly in plastic wrap and pop them in the fridge for up to two days. When you’re ready to cook, just let them sit on the counter for 30 minutes to warm up slightly before rolling them thin and baking. If you bake them ahead of time, they won’t reheat quite as perfectly, so I always prefer prepping the dough ahead of time!
What makes this a good Greek pita recipe?
When people ask for a Greek pita recipe, they usually mean something that is noticeably softer and slightly thicker than the super-thin Middle Eastern style, perfect for scooping up thick tzatziki! This recipe is great for that because it uses a relatively high flour-to-water ratio that keeps the dough pliable but sturdy enough to hold a little more substance. Plus, we aren’t over-rolling it—keeping it around 1/8 inch thick gives it just enough body to be satisfyingly fluffy pita bread without being doughy. If you like Greek flavors across the board, you might enjoy my recipe for fluffy Greek yogurt pancakes!
My pita bread is flat. What went wrong?
Don’t get mad at yourself; this happens to everyone! Ninety-nine percent of the time, if your easy pita bread doesn’t puff, it’s because your cooking surface wasn’t hot enough. I know I harp on this, but it’s the absolute truth! The dough needs to hit extreme heat—475°F if you’re baking, or smoking hot if you’re using a skillet—to instantly vaporize that internal moisture. If the surface is only medium hot, the dough dries out before the steam can build up and physically separate the layers. Give that baking sheet an extra 15 minutes of preheating time to build up that thermal energy!
Estimated Nutritional Data for Homemade Pita Bread
Now, I know most of us aren’t baking loaves of pita bread to count every calorie, but it’s nice to have a ballpark idea of what you’re enjoying, right? Because this recipe uses such simple core ingredients—flour, water, oil, yeast—it really isn’t too heavy. Since this is a flatbread from scratch recipe, the final count depends a bit on how thickly you roll the rounds, but here’s what we generally see per serving (which equals one whole pita bread):
- Calories: Around 180
- Total Fat: Just 2 grams
- Carbohydrates: About 36 grams
- Protein: A solid 5 grams
Remember what I always say about home baking: these are just estimates! If you use a different brand of flour, or maybe use a little more or a little less olive oil when greasing the pan, that number can shift slightly. For complete transparency, you can always check out my full nutritional disclosure page, but for the most part, these homemade pitas are wonderfully light and perfect for using as pita bread for hummus or for wrapping up those big, delicious fillings for gyros!
Print
Easy Homemade Pita Bread Pockets
- Total Time: 1 hour 45 min
- Yield: 8 servings
- Diet: Vegetarian
Description
Make soft, fluffy pita bread at home using this straightforward recipe. This method works well for achieving the perfect pocket for gyros or serving with dips.
Ingredients
- 1 1/2 cups warm water (about 105-115°F)
- 2 1/4 teaspoons active dry yeast
- 1 teaspoon sugar
- 3 1/2 cups all-purpose flour, plus more for dusting
- 2 teaspoons salt
- 2 tablespoons olive oil, plus more for greasing
Instructions
- Combine the warm water, yeast, and sugar in a large bowl. Let it sit for 5 to 10 minutes until foamy.
- Stir in the olive oil, flour, and salt into the yeast mixture. Mix until a shaggy dough forms.
- Turn the dough out onto a lightly floured surface. Knead for 5 to 7 minutes until the dough is smooth and elastic.
- Lightly oil a clean bowl. Place the dough in the bowl, turning to coat. Cover the bowl with plastic wrap or a damp towel. Let the dough rise in a warm place for 1 to 1.5 hours, or until doubled in size.
- Gently punch down the risen dough. Divide it into 8 equal pieces. Roll each piece into a smooth ball. Cover the balls and let them rest for 10 minutes.
- Preheat your oven to 475°F (245°C) with a baking stone or heavy baking sheet inside.
- Working with one ball at a time, roll it out on a lightly floured surface into a 6-inch circle, about 1/8 inch thick. Keep the remaining balls covered.
- Place 2 or 3 dough circles directly onto the preheated stone or sheet. Bake for 2 to 3 minutes until the pita puffs up completely.
- Remove the puffed pita bread from the oven. Place it on a clean towel and cover it immediately to keep it soft while you bake the remaining rounds.
Notes
- For stovetop cooking, heat a dry cast-iron skillet over medium-high heat. Cook each round for about 1 minute per side, flipping when bubbles appear, until it puffs.
- If your dough does not puff, your oven or skillet was likely not hot enough. Reheat the surface thoroughly before trying again.
- Store baked pitas wrapped tightly in a clean kitchen towel to maintain softness.
- Prep Time: 20 min
- Cook Time: 15 min
- Category: Bread
- Method: Baking/Stovetop
- Cuisine: Mediterranean
Nutrition
- Serving Size: 1 pita
- Calories: 180
- Sugar: 1
- Sodium: 350
- Fat: 2
- Saturated Fat: 0.3
- Unsaturated Fat: 1.7
- Trans Fat: 0
- Carbohydrates: 36
- Fiber: 2
- Protein: 5
- Cholesterol: 0

Comments are closed.