

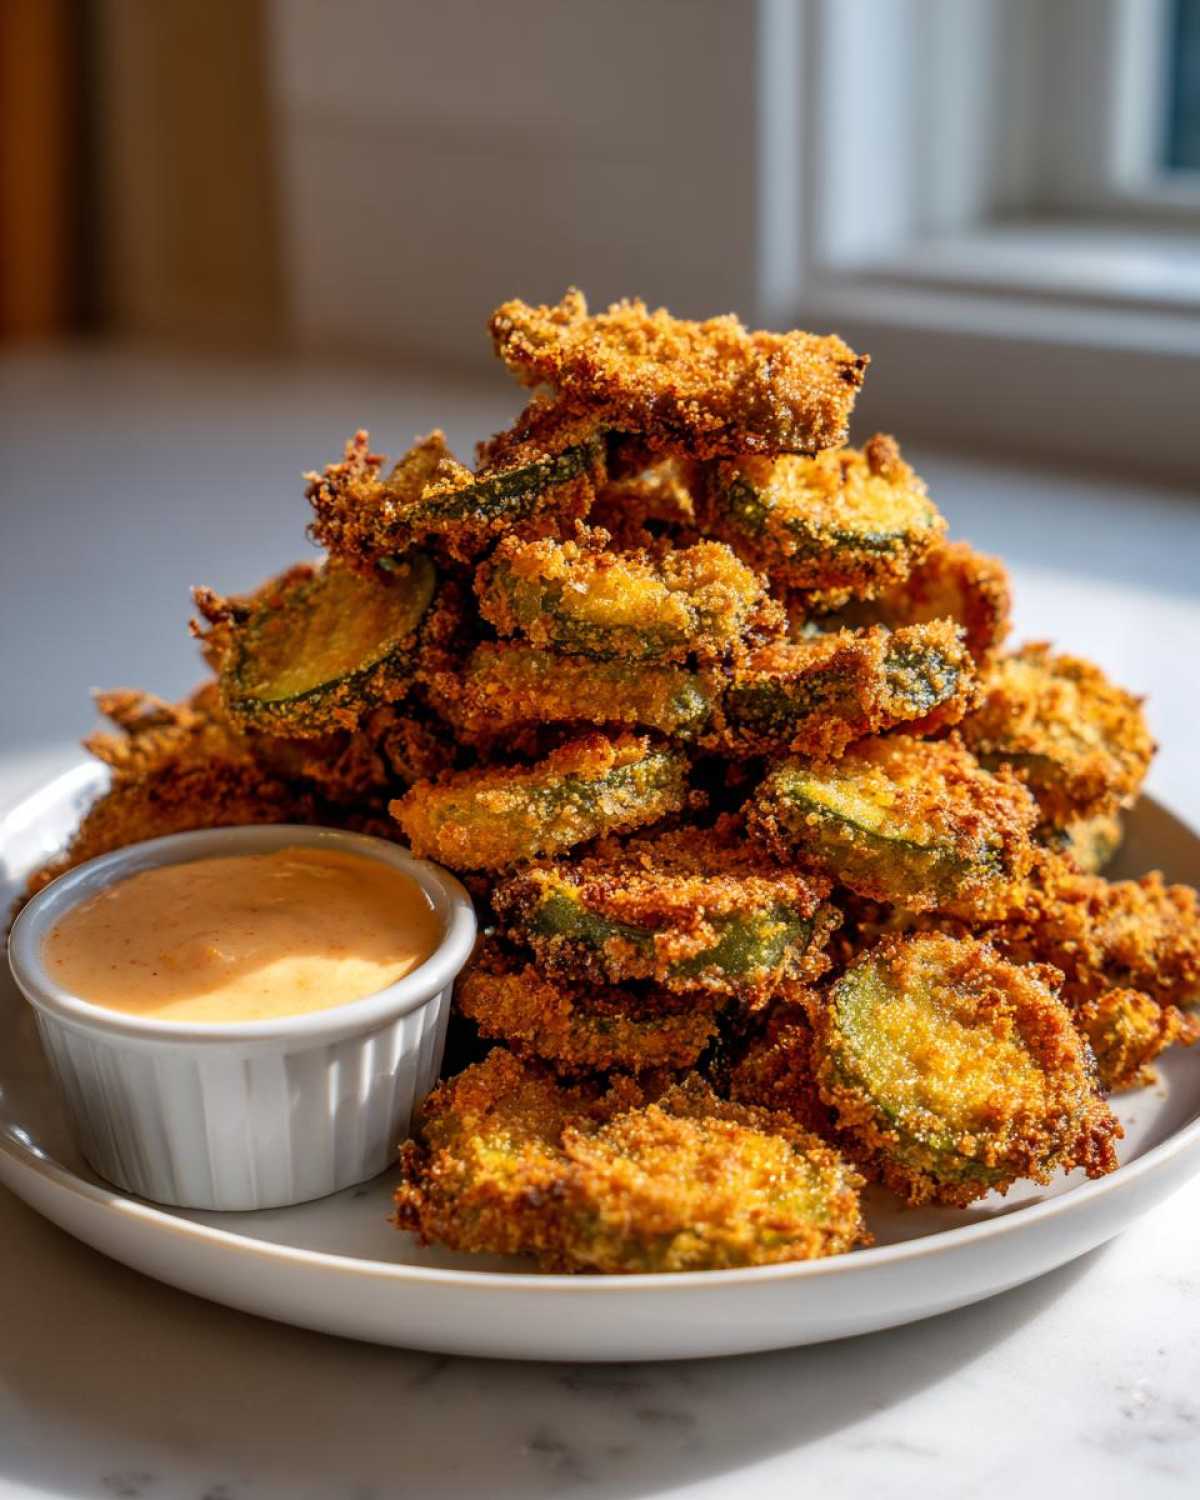
Oh my gosh, if you have been scrolling through endless, disappointing recipes for crispy snacks, STOP right now! Few things hit the spot like a hot, crunchy, tangy appetizer, and I’m here to tell you that making incredibly delicious **Fried Pickles** at home is unbelievably simple. Forget soggy messes; we are aiming for restaurant perfection here! After years of trying different batters—seriously, I wasted so many oil baths—I finally landed on this brilliant double-dredge method that locks in that crunch factor every single time.
This is the ultimate recipe for achieving that deeply satisfying snap. Plus, I wouldn’t let you make fried pickles without my secret weapon: a zesty ranch dipping sauce that cuts through the richness perfectly. Get your oil heating; we’re about to make the best appetizer ever!
Why You Will Love This Crispy Fried Pickles Recipe
Why bother with store-bought appetizers when you can whip up something this amazing? I made sure this recipe focused entirely on giving you that perfect texture. Seriously, they snap when you bite into them! You’ll want to make sure you have plenty of that dipping sauce ready because these **Fried Pickles** disappear fast. They are absolutely perfect for your next game day or just because it’s Tuesday!
- Guaranteed crunch thanks to the Panko coating and the dry pickle prep.
- So much better than any takeout version—you control the seasoning!
- It’s a genuinely quick recipe; you’re looking at less than 40 minutes total time.
- The tangy dill flavor pops beautifully against the savory crust.
- If you’re looking for easy party snacks that everyone asks for the recipe later, this is it.
Essential Ingredients for Perfect Fried Pickles
Okay, listen up, because ingredient quality is where we start getting those crunchy results. I always lay everything out beforehand, like a little chaotic cooking show stage. We need to be super clear about what goes where, especially because we are doing a three-step dredge. Don’t mix up your flour and your breadcrumbs—trust me, I’ve done it!
The key here is separation: the pickles, the dry coating, the wet binder, and finally, that beautiful, crunchy crust creator. And, of course, you can’t have great fried pickles without the perfect creamy counterpart. This sauce is truly the Best Fried Pickles Dipping Sauce alternative to what you get out!
For the Crispy Fried Pickles
We start with the star, and it has to be dry. Make sure that jar of dill pickle chips is completely drained and patted down. Those little guys need to be practically moisture-free before they hit the batter, or they just turn soggy!
- 1 (16 ounce) jar dill pickle chips, drained well
- 1 cup all-purpose flour
- 1 teaspoon salt
- 1/2 teaspoon black pepper
- 1/2 teaspoon cayenne pepper (This gives a little kick!)
- 1/4 teaspoon garlic powder
- 2 large eggs
- 1/2 cup milk
- 1 cup panko breadcrumbs (The Panko is non-negotiable for that crunch!)
- Vegetable oil, for frying
For the Zesty Dipping Sauce
This sauce needs about five minutes in the fridge to let those flavors marry up properly, so make it while your oil is heating, or even before! It’s creamy, tangy, and just packed with flavor.
- 1 cup mayonnaise
- 1/2 cup sour cream
- 1 tablespoon prepared horseradish
- 1 teaspoon Worcestershire sauce
- 1/2 teaspoon onion powder
- 1/4 teaspoon smoked paprika
How to Make Crispy Fried Pickles: Step-by-Step Instructions
This is where the magic happens, and honestly, it takes more timing than skill. The absolute, non-negotiable first step is making sure those dill pickle chips are bone dry! If they’re wet, your beautiful Panko crust will steam right off in the oil. After you pat them dry, we are setting up our dredging station. I usually use three separate, shallow dishes lined up—it’s like an assembly line for crunch!
If you have time before your guests arrive, I highly recommend this pro tip: after coating the pickles completely, lay them out on that wire rack and pop them in the fridge for about 15 minutes. That little chill time really sets the crust, making them even more sturdy for the hot oil. Also, keeping that oil right at 375°F (190°C) is crucial; too cool and they soak up oil; too hot and the coating burns before the pickle warms up!
Preparing the Pickles and Dredging Station
First things first: drain those pickle chips like your life depends on it, and then pat, pat, pat them dry with paper towels. Seriously, get them as dry as possible. Next, set up your workstation. Dish one gets your seasoned flour mix. Dish two is the egg and milk binder. Dish three better have those fluffy panko breadcrumbs ready to go!
Achieving the Ultimate Crunchy Pickle Appetizer Coating
Now we dip! Grab one pickle chip at a time. First, toss it well in the flour mixture, making sure every inch is covered, and then shake off the extra powder. Next, dip it into the egg wash, letting any drips fall away. Finally, sink it into the Panko, pressing lightly all over to make sure the crumbs stick really well. Pop that perfectly coated chip onto your prepared wire rack.
Frying the Fried Pickles to Golden Perfection
Get your oil up to that 375°F temperature. You’ll work in small batches—don’t overcrowd the pot, or the oil temperature drops instantly! Carefully slide those breaded beauties into the hot oil. They cook super fast, only about 1 to 2 minutes. Keep an eye on them; you want them golden brown, not dark brown. Use a slotted spoon to lift them out and put them right onto that rack lined with paper towels to drain. A quick sprinkle of salt right while they are hot seals the deal!
Mixing the Best Fried Pickles Dipping Sauce
While the last batches are frying, you can knock out the sauce quickly. Just combine the mayonnaise, sour cream, horseradish—don’t skip that horseradish, it’s the zing!—Worcestershire, onion powder, and paprika into one bowl. Whisk it until it looks completely smooth and creamy. If you’re making these for later, cover the sauce and chill it to let those flavors deepen up. Don’t forget that if you’re trying to make a lighter version, you can find tips similar to what we use for air fryer mozzarella sticks later on!
Expert Tips for Making Restaurant-Quality Fried Pickles
Folks always ask me how restaurants get that deep, uniform crunch, and I’m spilling the beans now! It really boils down to three main things after you nail the dredging, which we already covered. First, that oil temperature. You absolutely must stick to 375°F (190°C). If I’m frying a big batch, I keep my thermometer right in the pot. Dropping in cold pickles lowers the heat fast, so keep it steady!
Second, and I’ll say it again because it’s so important: dry pickles mean crispy snacks. Seriously, if you skip the paper towel step, you’re wasting your Panko! If you are aiming to replicate that famous chain flavor, you’re looking for a slight heat kick. You can definitely make a great Texas Roadhouse Fried Pickles Copycat version just by bumping up that cayenne pepper just a tiny bit in your flour mix. Give it a try; it really elevates these from just good snack food to ‘I need another batch’ food. Remember, these are meant to be served right away while piping hot for the best texture!
Variations: Air Fryer Fried Pickles for a Lighter Snack
I know, I know. Sometimes deep frying just isn’t in the cards, especially if you’re trying to keep things a bit lighter or maybe you don’t want to deal with that gallon of hot oil. Don’t you worry your little head! We can absolutely adapt this recipe for the air fryer. This way, you still get that fantastic, tangy crunch factor without all the fuss. It’s a great way to make them a healthy alternative snack.
The key to successful **Air Fryer Fried Pickles** is achieving that golden exterior without having them dry out inside. You’ll still want to do the full dredge, but the frying process swaps out for a good, heavy spray of oil. Trust me, you need to spray them liberally on both sides to get things golden and crispy. A light mist won’t cut it here!
When transitioning to the air fryer, you’ll need to adjust your cooking time significantly—it cooks faster, obviously! Set your air fryer to about 380°F (195°C). Instead of 2 minutes in oil, you’ll start checking them around the 8-minute mark. Flip them halfway through cooking, and plan on needing about 10 to 12 minutes total. They won’t have the exact same texture as the deep-fried ones, but they are shockingly close. If you’ve enjoyed making things like air fryer buffalo wings, you already know the drill here. Enjoy your healthy fried pickles!
Serving Suggestions for Your Crunchy Pickle Appetizer
The moment those golden fried bites come out of the oil, you need to serve them immediately! Seriously, nothing beats the texture of a piping hot, crunchy pickle fresh from the fryer. These aren’t good reheated—they are *amazing* straight out of the pot. They are far too delicious to wait for, which is why they make such show-stopping party food.
I love setting up a big platter right in the middle of the table so everyone can just grab and go. The zesty sauce goes right next to them in a little bowl—you don’t want a dipping competition breaking out!
These are fantastic additions to any snack spread. Think about your next big watch party; you absolutely need them on your spread of Game Day Appetizer Recipes lineup. They go perfectly alongside things like wings or sliders because they offer that perfect, sharp, tangy contrast to richer, cheesier items. They are also a total crowd-pleaser at summer cookouts because they’re cold on the inside and hot and crispy on the outside. Trust me, once you start serving these, everyone will ask you how you made such amazing **Fried Pickles**.
Storage and Reheating Instructions for Fried Pickles
Listen, I won’t lie to you—nothing beats a perfectly crisp **Fried Pickle** eaten within five minutes of coming out of the oil. That initial *snap* is the goal, and unfortunately, fried food is pretty demanding when it comes to leftovers. If you do manage to have any left over (which I seriously doubt!), you need to handle them gently.
Do not try to store them in an airtight container; that’s the fastest way to turn your crunchy coating into soggy, sad sadness. If you absolutely must save some, place them on a plate lined with paper towels and try to get them into the fridge uncovered as fast as possible. They are best eaten the day you make them, period.
But hey, we can bring them back! Reheating is key here. If you grab the microwave, you might as well just eat them cold, because it will ruin them instantly. You need dry heat to tackle that moisture trapped inside the breading. If you’re only reheating a handful, the air fryer is your absolute best friend—set it to about 375°F for just 4 to 6 minutes. It gently crisps up the Panko again without burning the pickle.
If you have a bigger batch, use your conventional oven. I set mine to 400°F (200°C) and spread the leftover pickles in a single layer on a baking sheet—make sure you use that wire rack again if you have one underneath! Let them bake for about 8 to 10 minutes, flipping them halfway through. You’re just trying to dry out that crust until you hear that satisfying little crunch return. Enjoy those revived **Fried Pickles** with a fresh dip!
Frequently Asked Questions About Fried Pickles Recipe
It’s natural to have a few head-scratchers pop up when you are trying to nail a restaurant-quality snack like this. I’ve gathered up the questions I get most often about these fantastic **Fried Pickles**, so hopefully, we can clear things up and get you back to frying the *best* ones!
If you love pickles as much as I do, you might also enjoy making my favorite dill pickle bloody mary recipe for your next brunch gathering!
Can I use sweet pickles instead of dill for these Fried Pickles?
Yes, you totally *can*, but honestly, I wouldn’t recommend it if you’re aiming for that classic, punchy flavor. This recipe thrives on the sharp, tangy contrast that the dill pickle chips provide against the savory, hot crust. Using sweet pickles will give you a totally different experience—more sweet than savory. If you try it, let me know how it goes!
What is the secret to making truly Crispy Fried Pickles?
I’ve told you this before, but it’s worth repeating because it’s the biggest make-or-break factor: you have to pat those pickle chips totally dry before they even *think* about hitting the flour. I mean bone dry! It’s that simple. Excess moisture in the pickle immediately turns your hot oil into super-hot steam, and steam equals soggy batter. Dry pickles equal that perfect, satisfying crunch you’re looking for.
How can I make this a Texas Roadhouse Fried Pickles Copycat?
That flavor is iconic, isn’t it? If you want to replicate that popular menu favorite, you’re already halfway there since we are using Panko breadcrumbs, which they use for that incredible texture. The other secret is dialing in the seasoning in your flour dredge. Make sure you use a generous amount of that cayenne pepper and maybe even add a tiny pinch more black pepper than I listed. That blend gives you the signature Piquant kick you taste in the restaurant version!
Nutritional Estimates for Homemade Fried Pickles
Now, I always tell people that once you deep-fry something, maybe don’t look too closely at the nutrition label, right? Ha! But for those of you keeping track, here are the estimated values for a serving of the pickles themselves, before you get too excited about that amazing dipping sauce! Remember, these numbers are just estimates, and they definitely change depending on how much oil your beautiful, crispy coating soaks up. You can check out my full food safety notes over at my official disclaimer page.
- Serving Size: 1/4 of recipe (pickles only)
- Calories: 350
- Fat: 25g
- Carbohydrates: 28g
- Protein: 5g
Share Your Golden Fried Bites
That’s it, my friend! You now have the secret sauce—literally and figuratively—to making the absolute best, crunchiest **Fried Pickles** you’ve ever had outside of a Texas diner. I’m so excited for you to try these tangy, golden bites alongside that zesty dipping sauce!
I really, truly want to hear how they turned out for you! Did you get that perfect snap? Did the kids devour the whole plate before you could even sit down? Drop a 5-star rating down below if these nailed your craving for a seriously crunchy pickle appetizer. And please, please, leave a comment! Hearing about your game day success or any little tweaks you made to the spice blend is the best part of sharing these recipes!
Print
The Ultimate Crispy Fried Pickles Recipe with Zesty Dipping Sauce
- Total Time: 35 min
- Yield: 4 servings
- Diet: Vegetarian
Description
Make restaurant-style crispy fried pickles at home using this simple deep-frying method. This recipe includes instructions for the pickles and a zesty ranch dipping sauce.
Ingredients
- 1 (16 ounce) jar dill pickle chips, drained well
- 1 cup all-purpose flour
- 1 teaspoon salt
- 1/2 teaspoon black pepper
- 1/2 teaspoon cayenne pepper
- 1/4 teaspoon garlic powder
- 2 large eggs
- 1/2 cup milk
- 1 cup panko breadcrumbs
- Vegetable oil, for frying
- For the Zesty Dipping Sauce:
- 1 cup mayonnaise
- 1/2 cup sour cream
- 1 tablespoon prepared horseradish
- 1 teaspoon Worcestershire sauce
- 1/2 teaspoon onion powder
- 1/4 teaspoon smoked paprika
Instructions
- Drain the pickle chips thoroughly and pat them completely dry using paper towels. This step is key for crispiness.
- In a shallow dish, whisk together the flour, salt, pepper, cayenne pepper, and garlic powder.
- In a second shallow dish, whisk the eggs and milk until combined.
- In a third shallow dish, place the panko breadcrumbs.
- Dredge each pickle chip first in the flour mixture, shaking off excess.
- Dip the floured chip into the egg mixture, allowing excess to drip off.
- Coat the chip completely in the panko breadcrumbs, pressing gently to adhere. Place coated chips on a wire rack set over a baking sheet.
- Heat about 2 inches of vegetable oil in a heavy-bottomed pot or deep fryer to 375°F (190°C).
- Working in small batches, carefully lower the breaded pickles into the hot oil. Do not overcrowd the pot.
- Fry for 1 to 2 minutes, turning once, until they are golden brown and crispy.
- Remove the fried pickles with a slotted spoon and place them immediately on a clean wire rack lined with paper towels to drain excess oil. Sprinkle lightly with salt while hot.
- To make the sauce, combine the mayonnaise, sour cream, horseradish, Worcestershire sauce, onion powder, and smoked paprika in a small bowl. Whisk until smooth.
- Serve the hot, crispy fried pickles immediately with the zesty dipping sauce.
Notes
- For extra crispiness, you can chill the breaded pickles on the wire rack for 15 minutes before frying.
- If you prefer a thinner pickle, use whole dill pickles sliced lengthwise instead of chips.
- If you do not have a thermometer, the oil is ready when a drop of batter sizzles immediately and floats.
- Prep Time: 20 min
- Cook Time: 15 min
- Category: Appetizer
- Method: Deep Frying
- Cuisine: American
Nutrition
- Serving Size: 1/4 of recipe (pickles only)
- Calories: 350
- Sugar: 4
- Sodium: 850
- Fat: 25
- Saturated Fat: 4
- Unsaturated Fat: 21
- Trans Fat: 0
- Carbohydrates: 28
- Fiber: 1
- Protein: 5
- Cholesterol: 75
Comments are closed.